Pages

Showing posts with label hobby lobby. Show all posts

Friday, November 20, 2015

Genesis 1:1 Bible Journaling

Hello Creatives! 

Well...I did it! I finally did it! I finally bought an actual journaling bible!! 


For my first entry I thought I would start...where else, but the beginning: Genesis 1:1. 


For those of you that don't know, I actually have a tattoo on my right wrist of this scripture reference: 


For me it's a reminder that the only reason I can do what I do creatively is because he first created me. That is what I wanted to document as my first entry. For the first page to always stand as a reminder of why I am journaling in the first place and who I am journaling to. 


I had so much fun with these great Alphas, labels and washi I found at Joann's for only $1 each! 


 I also used washi from Hobby Lobby, Distress Paints by Tim Holtz, DecoArt Media Misters, stencils from The Crafters Workshop and a black Sharpie. 


I hope you enjoyed today's entry!! 

Xoxo, 
Keri 

Monday, November 24, 2014

What does the FOX say?!??

I can't believe I just said that! Haha! But...I couldn't help it! 

Today, I want to share with you a new drawing. I had seen a few videos on You Tube where they used Watercolor Crayons and I found a small set at Hobby Lobby, so I decided to give them a try...and I LOVE THEM! I'm not the greatest with regular watercolor because I like more control. I feel like I can get that from the crayons. 

Here's my foxy lady!! 


I was singing at both services at church yesterday, so I made a little graphite sketch while we were hanging between services. 


I thought she would be a lot of fun to test out my new watercolor crayons with! 


In progress...I'm not sure the best way to use the crayons, so I just started with coloring in my fox like I was just using regular crayons. I then used a slightly damp paintbrush and blended like you would regular watercolors. The watercolor crayons came with a paintbrush, but to me it seemed to fluffy so I used a smaller square brush (I will test the fluffier brush out and let you know how I like it!)


Once I was done I added some black outlines using my Faber-Castell Black PITT pens. (Sorry for the bad picture! Lol)

I have been practicing my sketching and drawing lately, so I can't wait to share more!! 

More to come! 

Xoxo, 
Keri 

Friday, November 21, 2014

Core'dinations Blog Hop with Graphic 45

Hello Lovely Lifers!

I hope you are having an amazing day. 

Today, I want to share with you a super fun blog hop that is going on with Graphic 45 and Core'dinations Cardstock.

Graphic 45 is having an AMAZING giveaway!!


Today, is my day and I decided to go Mixed Media for my project.


Core'dinations is a fantastic line of cardstock that has different color cores so when it's sanded, crumbled and distressed it shows different colors.

Here is a sneak peak of the base for this piece:


Want to see more?

Check out the Graphic 45 Blog for more details and more fantastic projects!!


XOXO
KERI


Thursday, October 16, 2014

Going Little in a Very BIG Way!

Hello Lifers!!

Today I am SUPER excited to FINALLY share my first EVER mini scene.

It's featured in today's Graphic 45 Newsletter using their new Mixed Media Boxes.
{don't get the news letter? Click Here to Sign Up


I used  the Graphic 45 "Baby 2 Bride" re-released collection and their new 5x5 Mixed Media Box in Kraft.


I wanted to go with the Bride theme and make a scene that looked like a someone was getting ready for a special day.

I started with making an origami dress.


Check out How to Make an Origami Dress With Graphic 45 by Keri Sallee on Snapguide.


I added these fun "mini" touches I found in the doll furniture section of Hobby Lobby. I distressed the little dresser Shabby Chic style to keep with the pastel tones of the Graphic 45 paper.

The frame on the right is made from a blank necklace bezel that I cut a coordinating G45 sticker to fit. 

My photo frame on the back wall is made from a stamp that come with the G45 "Raining Cats and Dogs" Collection. that I popped up a "Baby 2 Bride" sticker on.


My rug is made from a piece of paper that was fringed. How perfect?!


Behind my dress is a collage of vintage inspired wall decor. Like my other wall, my frames are made from blank necklace bezels. That beautiful cameo was found at an antique market (it's a reproduction though) and my key is from Graphic 45.


I LOVE my little scene! My shoes are compliments of my neighbors little girls and their huge Barbie collection! LOL

To finish my project, I wanted to make my cover reminiscent of a wedding bouquet.


 I used Petaloo Flowers, Prima Marketing Flowers and flowers from The Paper Studio and Michaels. I added bits of lace and a G45 Key Hole.

So there you go! I hope you enjoyed my "little" project! I hope it inspires you to try something new!

XOXO,
KERI


Monday, June 16, 2014

Betty the Glamper...she's almost done!!

Good morning lifers! 

I hope you had a fabulous weekend...I know I did! 

As many of you know, we recently bought an old pop-up camper and decided it needed a little love (not everyone is down for fake wood and a rainbow of country mauves and blues.) 

Today, I wanted to show you some updated pics! I spent most of last week at my sewing machine making her new curtains, pillows and covering the ugly cushions. 

In total, I made 8 pillows, 9 curtains and recovered 6 cushions...I don't think I have sewed this much in my entire life. Lol. 

Oh...did I mention her name was Betty? Why Betty? Well, my sister (who we are traveling with in a few weeks) is redoing her camper as well and we wanted their names to be "related" somehow. We thought about starlets or maybe Wilma and Bett or Starlight/Starbright, but eventually we landed on: BETTY AND VERONICA!! It's actually pretty perfect for our personalities and the looks of our campers. 

Wanna see?  


I fell in love with this big stripe because it felt like the old changing "tents" that you used to find at beaches back in the day. The stripes, coral pattern and anchor pattern materials all came from Hobby Lobby. The navy blue sailboat and the cushion fabric both came from Hancock in the Home Decor Section. 

Wanna money saving tip?! For pillows, don't buy pillow inserts! They can cost anywhere from $8-$15 each. Instead, go to your local thrift store and buy ugly throw pillows (the uglier they are the cheaper they are and the funnier looks you'll get at check out! Haha!) throw them in your dryer on the sanitize cycle (or high heat if you don't have a fancy dryer.) Then simply cover your pillows for a fraction of the cost. My 8 pillows cost a whopping $16 at my local thrift store. 


You can see on the top of this curtain, I added a strip of the cushion fabric to the too. I did this for 2 reasons: (1) it ties the whole thing together and (2) my striped fabric was about 10in too short for the length I needed and I was not about to try to line up all those stripes to add more of the same fabric! 

We painted 2 coats of Valspar primer and paint all in one over the ugly faux wood. We chose the outdoor version since the camper will have to endure temperature changes. The white REALLY brightens the whole thing up and is a really cheap and simple change. We bought just a quart and didn't even use the whole thing. 


I love how my brighter colors POP of my darker cushions. Plus...better for stains! 

If you're thinking about Glamping (glamour + camping) here's a few money saving tips we've found along the way! 

(1) like I said above...instead of buying new pillow inserts, buy used throw  pillows at your local thrift store and recover to match. Just remember to check them closely for scary stains and santize them in your dryer. 

(2) remember your space is small. You might be used to buying gallons of paint, but 1 quart is more than enough for your little space. 

(3) Check what you have in hand already! We all have gallons of paint leftover from various projects. You might have what you need sitting your garage right now. We painted the vent covers gray (sorry no pics of them!) using a gray spray paint we already owned. (We learned this lesson the hard way...we totally had paint sitting in our garage that we could have used!)

(4) Check your local Habitat for Humanity Restore or other similar charity store that specializes in home products. We were looking at new handles (we needed 8) at a big box home improvement store and the ones we liked were $3-$5 each. Uummm....no. My hubby went to our local Restore and found them for $1 each. Much better right?

(5) don't forget the coupons on the fabrics! Hancock Fabrics has coupons and sales through their website and in print, while JoAnn's and Hobby Lobby both have apps. Look closely though...usually the coupon can only be used on one "cut" of fabric, so it might require multiple trips or a helper to go through a different line to get the savings.

(6) When it comes to fabric, spend a little more for your cushion fabric. It's gonna get a lot of use. For pillows and curtains, a canvas or duck cloth works great because it's sturdy, but not too expensive. 

So there you go....Betty is about 80% done. I can't wait to show you the finished project and the pics of her in action in just a little under 2 weeks. 

Have an awesome day and remember...make your art intentional...not an after thought. 

Xoxo, 
Keri 

Friday, March 28, 2014

Getting Blingy with The Buckle Boutique

Hello Lifers!

Today I want to share something super fun with you!

At Winter CHA this past January, I had the opportunity to meet Cathie from a little company called The Buckle Boutique.

They were debuting this new product they called Rhinestone Resin Self-Adhesive Sheets. These rhinestone sheets have something no other rhinestone sheet  (that I know of) has ever had...the ability to be CUT into anything you want them to be. They can be cut with scissors, craft knifes and even your Cricut.

I was so honored that Cathie wanted to send me a couple of sheets to see what I could come up with.

Here's a couple of things I came up with:


This started out as an MDF Chest of Drawers from Kaisercraft. With the sheets being self-adhesive, I just cut a piece slightly larger than my piece, adhered it to the side and then used my craft knife to trim it. My craft knife went through it with no problems!

Here are a few closeups. 


To make my chevron, I used a chevron punch my Emaginations (sorry...this company is out of business) and cut pieces from my rhinestone sheets and laid them next to each other to form my chevron stripe. (YES! You can cut them with a punch!!) 


The rhinestones sheets were also perfect to make some sweet, quick and simple pendents. 

Cut a piece of Rhinestone Sheet to size and adhere it to your bezel. Then glue a simple embellishment to the center and you're done! What is fun about this pendent is that it is actually double sided! So no matter which way it is flipped, there is something fabulous!


Here are a couple of my favorite tips for working with The Buckle Boutique's Resign Rhinestone Self-Adhesive Sheets:

(1) When using a punch, flip the punch over so that you can make sure that the lines on your stones are straight. 

(2) If you are trying to cover a surface like my Chest of Drawers, it is much easier to cut your sheet just slightly larger than your piece, adhere it and then trim with your craft knife. 

(3) For jewelry, use an ink to stamp your bezel shape on the back of your Rhinestone Sheet. Cut just inside your line and you will have the perfect shape without all the guess work. 

My next plan....cut out some shapes on my Cricut!

I can't wait to share them with you.

For more information and to see all of the fabulous designs, check out The Buckle Boutique

Until next time...remember...make your art intentional...not an after thought.

XOXO,
KERI

Wednesday, February 12, 2014

Let's get "Tickled Pink" with Susan K. Weckesser!!

Hello Lifers!

It's my turn over on the Susan K Weckesser Blog "My Sweet Earth" and today I am sharing my canvas called "Tickled Pink."


I made this canvas by framing a Prima Marketing Acrylic Transparency (painted with Tattered Angels Glaze) inside a frame I made by stamping Susan's In Circle Me Stamp by Unity Stamp Company into almost dry modeling paste. 

Here are a few of my steps to help you visualize the process:

1) The Transparency

The transparency is 6x6 and was actually part of a 12x12 transparency that featured 4 different styles. I liked this one because of the little window.


I actually flipped it over and painted on the back to that when you saw it from the front, the black lines were still crisp. All the painting on the back was done with Tattered Angels Glimmer Glaze. I also added some clouds using Susan's "Celebrate Your Day" Stamp from Unity Stamp Company using Ranger Archival Ink and painted those as well. 


2) The Border:

To Make this easier, I cut a scrap piece of paper to 6x6 and lightly tacked it in the center of my canvas, leaving my boarder. (I cut the hole out to make it easier to remove later.)


Once your remove the scrap paper, keep it! You'll need it in a minute! 

Next, using your heat gun and working in small section, dry your modeling paste until no longer sticky, but still move-able. This process might take a little trial and error-trust me!

When you've reached the right consistency, firmly press your stamp into the paste, being careful not to let it slide.


While working around your frame, rotate your stamp so that you get different angles to your texture. 


See...trial and error! :) I got a little hasty on a couple of spots and ended up with modeling paste on my stamp. NOTE!! Clean the modeling paste off your stamp ASAP...it is a PAIN to get off once it's dry.

For the base color, I used Tattered Angels Plain Jane Baseboard in Plain Daffodil. Place your scrap piece of paper back in the middle to keep your lines crisp.


And then...I messed up...I did not take pictures of the next steps. So Sorry!

Here is a couple of close-ups so you can see the texture better:


To get this effect I followed these steps:

a) Once my yellow was dry, I took 5 colors of Tim Holtz Distress Ink (Pickled Raspberry, Broken China, Peacock Feathers, Peeled Paint and Spiced Marmalade)  and randomly rubbed it over my surface. I used my finger to soften it a little.

b) Next, I used Tattered Angels Plain Jane Simply Sheer in Burlap to tone my colors down a little. Keep this very light...you're wanting to tone down...not cover up.

c) Once I reached this point, my frame was still matte and it looked wrong next to my shiny transparency, so lastly I added some Tattered Angels Glam in Chandelier over the top. (A little JMO: Chandelier is the best GLAM color if you are looking to start a Tattered Angels collection. Because the base is clear and the chunky glitter in iridescent, it is very multi-purpose and less intimidating than other Glam colors.)

3) A little Finishing Touch:

To add a little finishing touch to my piece, I had these great acrylic butterfly stickers I had bought at Hobby Lobby that I thought would be a perfect addition.

Because the back was sticky, I had to do my Glaze painting on the front, so I had to be a little cautious to stay in the lines (not a fun job for someone like me! LOL!)

Here is what it looked like in the light before I added it to my project:


So there you go!

I hope you will give this technique a try. Share your link in the comments...I would LOVE to see what you do!

Until next time...choose to make your art intentional..not an after thought.

XOXO,
KERI


Monday, November 4, 2013

Hand-made Christmas-My Wish Book

I'm so excited to be featured on Susan K. Weckesser's Hand-made Christmas Love Campaign today!!

My project is " My Wish Book"


For more details, head on over to Susan's Blog: My Sweet Earth

A BIG Thank you to our Christmas Love Sponsors:

Susan K. Weckesser (of course!)
Fancy Pants Designs
Canvas Corp
Tattered Angels
7Gypsies
Core'dinations
May Arts Ribbons


Also at the blog....


To start off this wonderful year 5th year of the Christmas Love Campaign, we are having a Hand-made Christmas Contest

 What you have to do: 

 *Follow along during our Hand-made Christmas event from November 2 - November 16, 2013 at Susan K Weckesser Inc blog

*Like the Christmas Love Campaign Facebook page ---> HERE.

 *Make your own Hand-Made gift. (it can be something you designed yourself or if you want try something that the designers have created please go ahead and have fun and do that!)

*Take a picture and post it on our facebook page. Or if you have Instagram post it there and tag it #craftuplove , #christlovecampaign & #susankweckesserinc so I see it! You can find me @ [SUSANKWECKESSER] on Instagram, so come follow me and I would LOVE to follow you! So much fun! 

 *Give your gift to a neighbour or stranger to make them smile! SPREAD THE LOVE! 

 *Come back to our Hand-Made Christmas post and let us know that you have crafted up some love and you will be entered to win a awesome prize pack from the above sponsors. The prize will include lots of goodies so you can craft up more love! How awesome is that! You have until November 17, 2013 at midnight MST to enter. Have fun! COME & JOIN US!

Tuesday, October 22, 2013

My Day...with Authentique Paper!

Jazzed...Excited...Freaked Out...Stoked...Ecstatic...

All these describe how I feel today.

I have the HONOR of being the featured Guest Designer today for on of my favorite companies Authentique Paper.

If you are a follower of scrap companies, you know that Authentique has only been around a few years, but has really made a SPLASH in a short time. Their patterns and colors are versatile, while the texture and weight of their paper makes them VERY easy to work with and do all types of crafts. Their stickers sheets (they call them "details") comes with words, alphas and every kind of embellishing sticker combo you would ever need!

For this guest spot, I was sent their "Thrilling" Collection. Full of a variety of oranges and vintage images, it was a lot of fun to play with.

For the complete post, head on over to Authentique Paper's Blog.

Here are a few more pics that didn't make it into the post and a quickie tutorial!

First UP... 
My "Thrilling" Shadow box


The "shadowbox" is actually a fake. It's just a chunky 12 x 12 canvas, turned backwards!

The frames and bow are made from dies by Vicki Chrisman for Accucut and the bottles are 7Gypsies.

Everything else is just paper, glue and Authentique Details Stickers.

Here is a couple of new closeups!


NEXT...
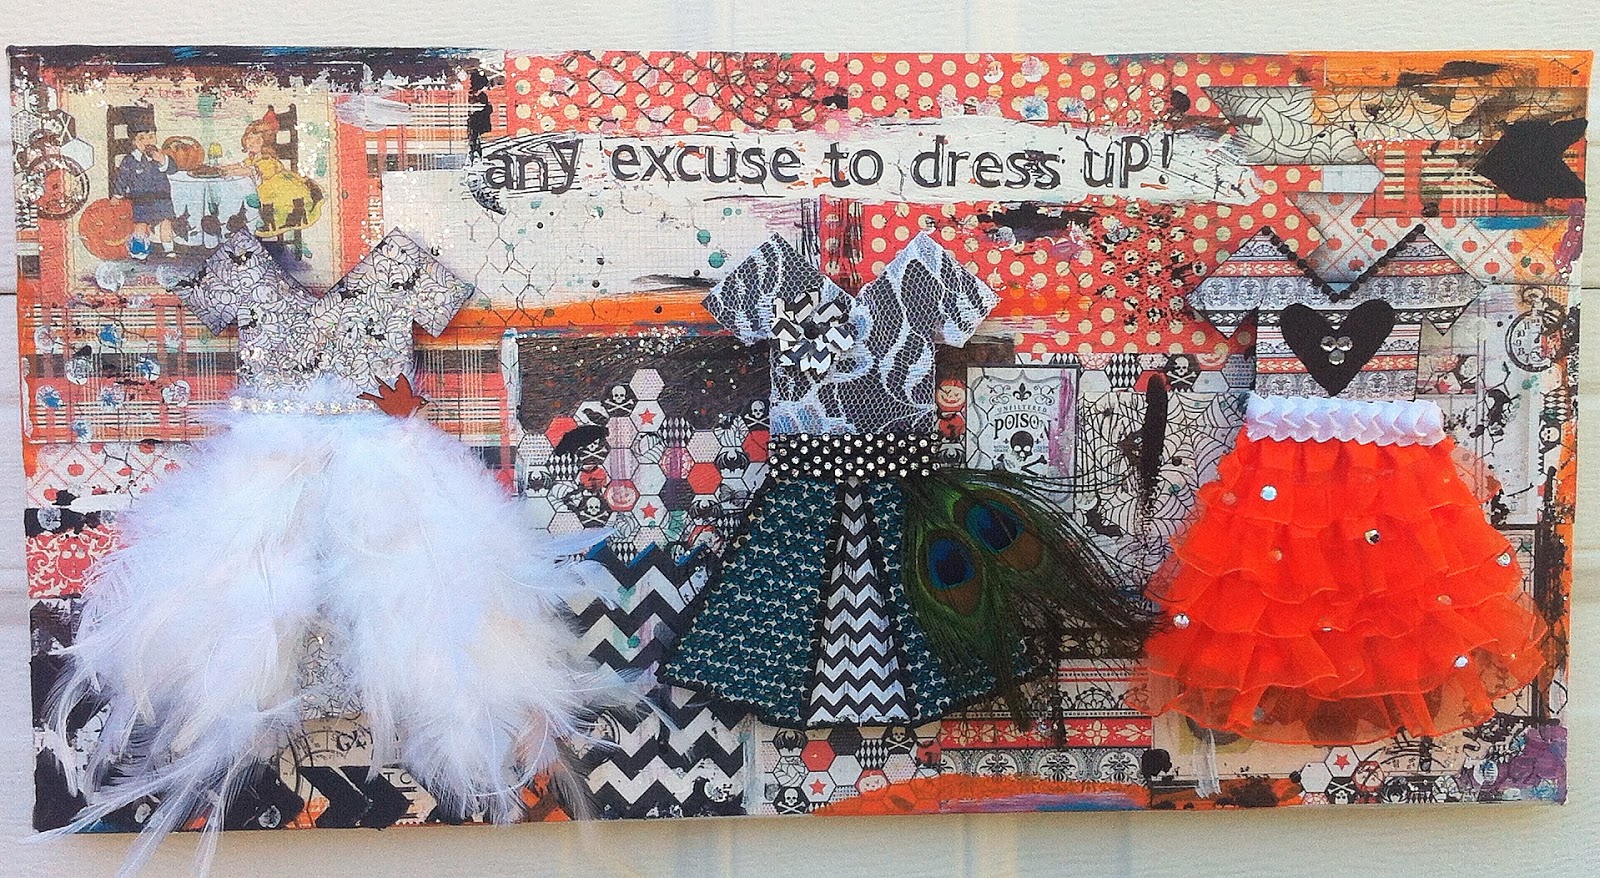
"Any Excuse to Dress Up" Mixed Media Canvas


I really wanted to do one piece that was just crazy and fun. 

I started out by making a 5 Origami Dresses from the Authentique 6 x 6 pad from the "Thrilling" Collection.

My original idea was a little different, but when I decided on this 20 x 10 canvas from Hobby Lobby, I decided to narrow my dresses to just 3.

Here is where I found my tutorial for my dress: Origami Dress Tutorial. It was my favorite out of all the ones I checked out.

A little tip here...during the step where you are folding up to make the bodice, flip the project over to make sure your bodice is all enough for your project. Mine was not and I actually cut the tops off my origami dress and hand-cut new ones.  Took some time...don't make my mistake! LOL. 

All of the dresses are set on a stack of corrugated cardboard scraps to give them height off the canvas.

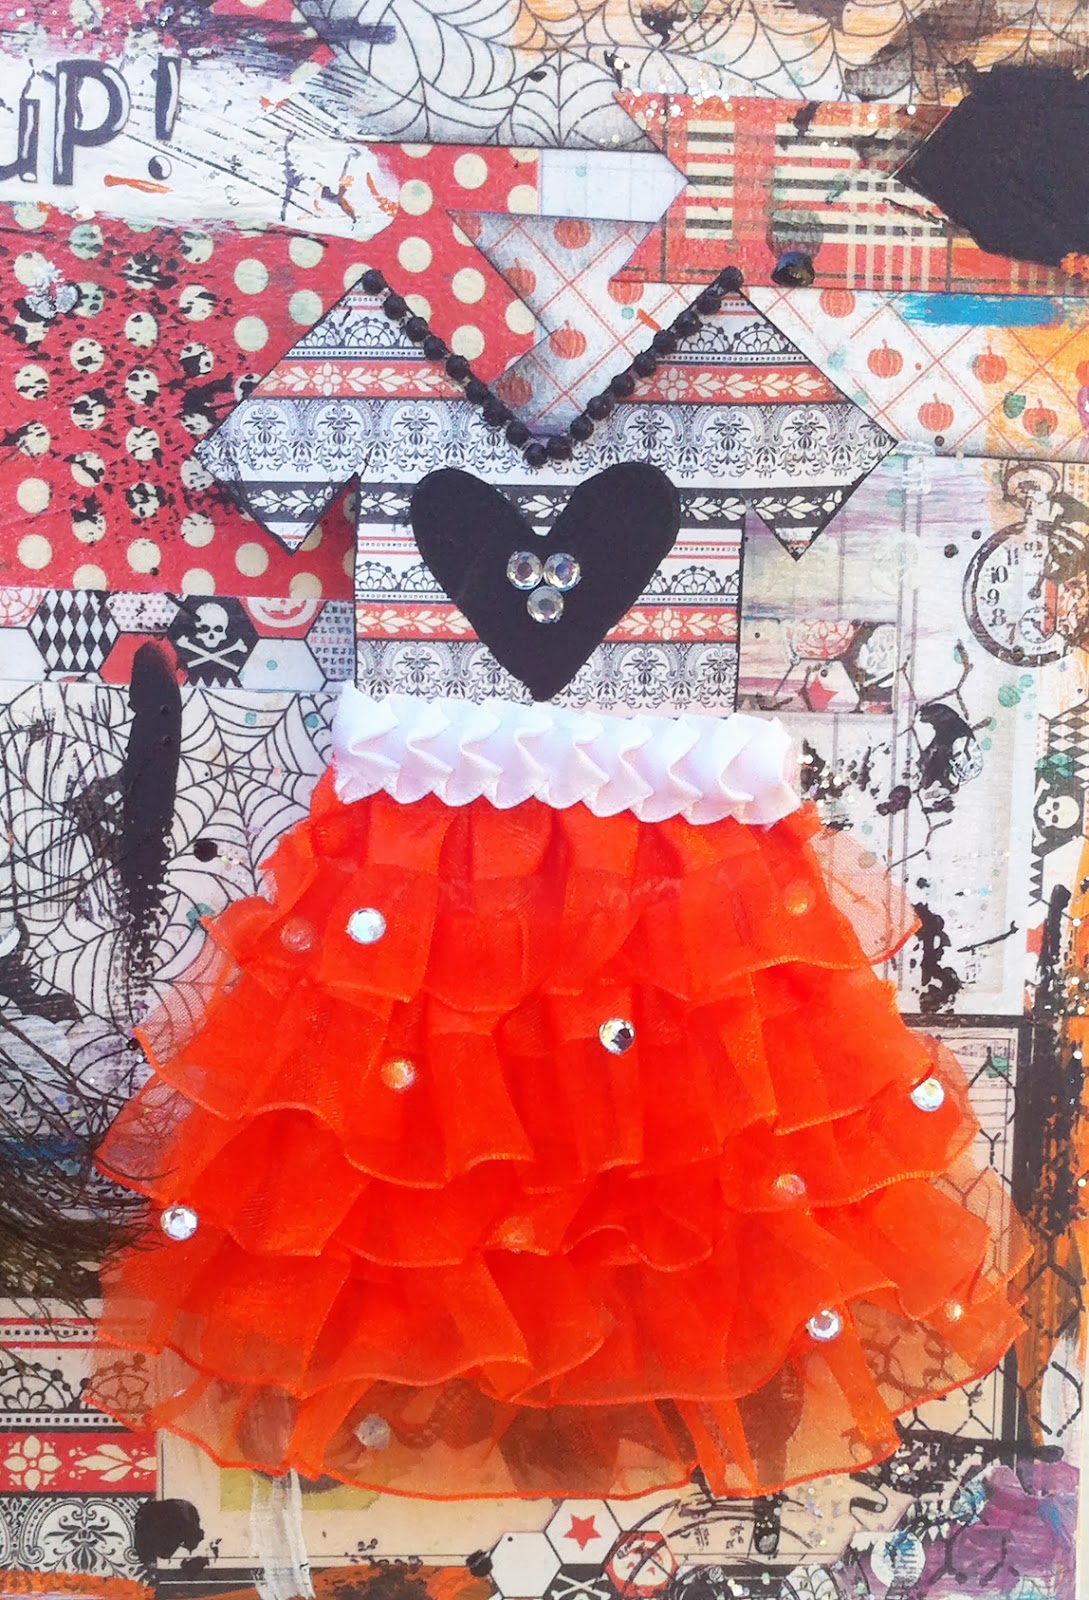
Here is a close-up of all three dresses:

It's hard to tell in picture, but for the Peacock Dress, all the turquoise you see on the skirt is bling that I bought at Hobby Lobby. The fact that it came in long "sheets" of 10 x 60 helped fill the skirt in pretty fast. 


This skirt is made of layered ruffle ribbon, loose bling and some additional ribbon. The heart on the shirt was made with Modeling Paste and a Heidi Swapp Stencil.  


This is my favorite! Think: Couture Bride of Frankenstein. She's got her pats and spiderweb's that are covered in glitter glue, tons of loose feathers make up her skirt, along with a "diamond" waistband and orange birdie for good luck. 

For the background, I Modged Podged paper from the "Thrilling" Collection, before splattering and painting it up with glitter glue, acrylic paint, Tattered Angels and Modeling Paste colored Black through a Heidi Swapp Stencil.

Lastly....
"Monsters in the Trees"


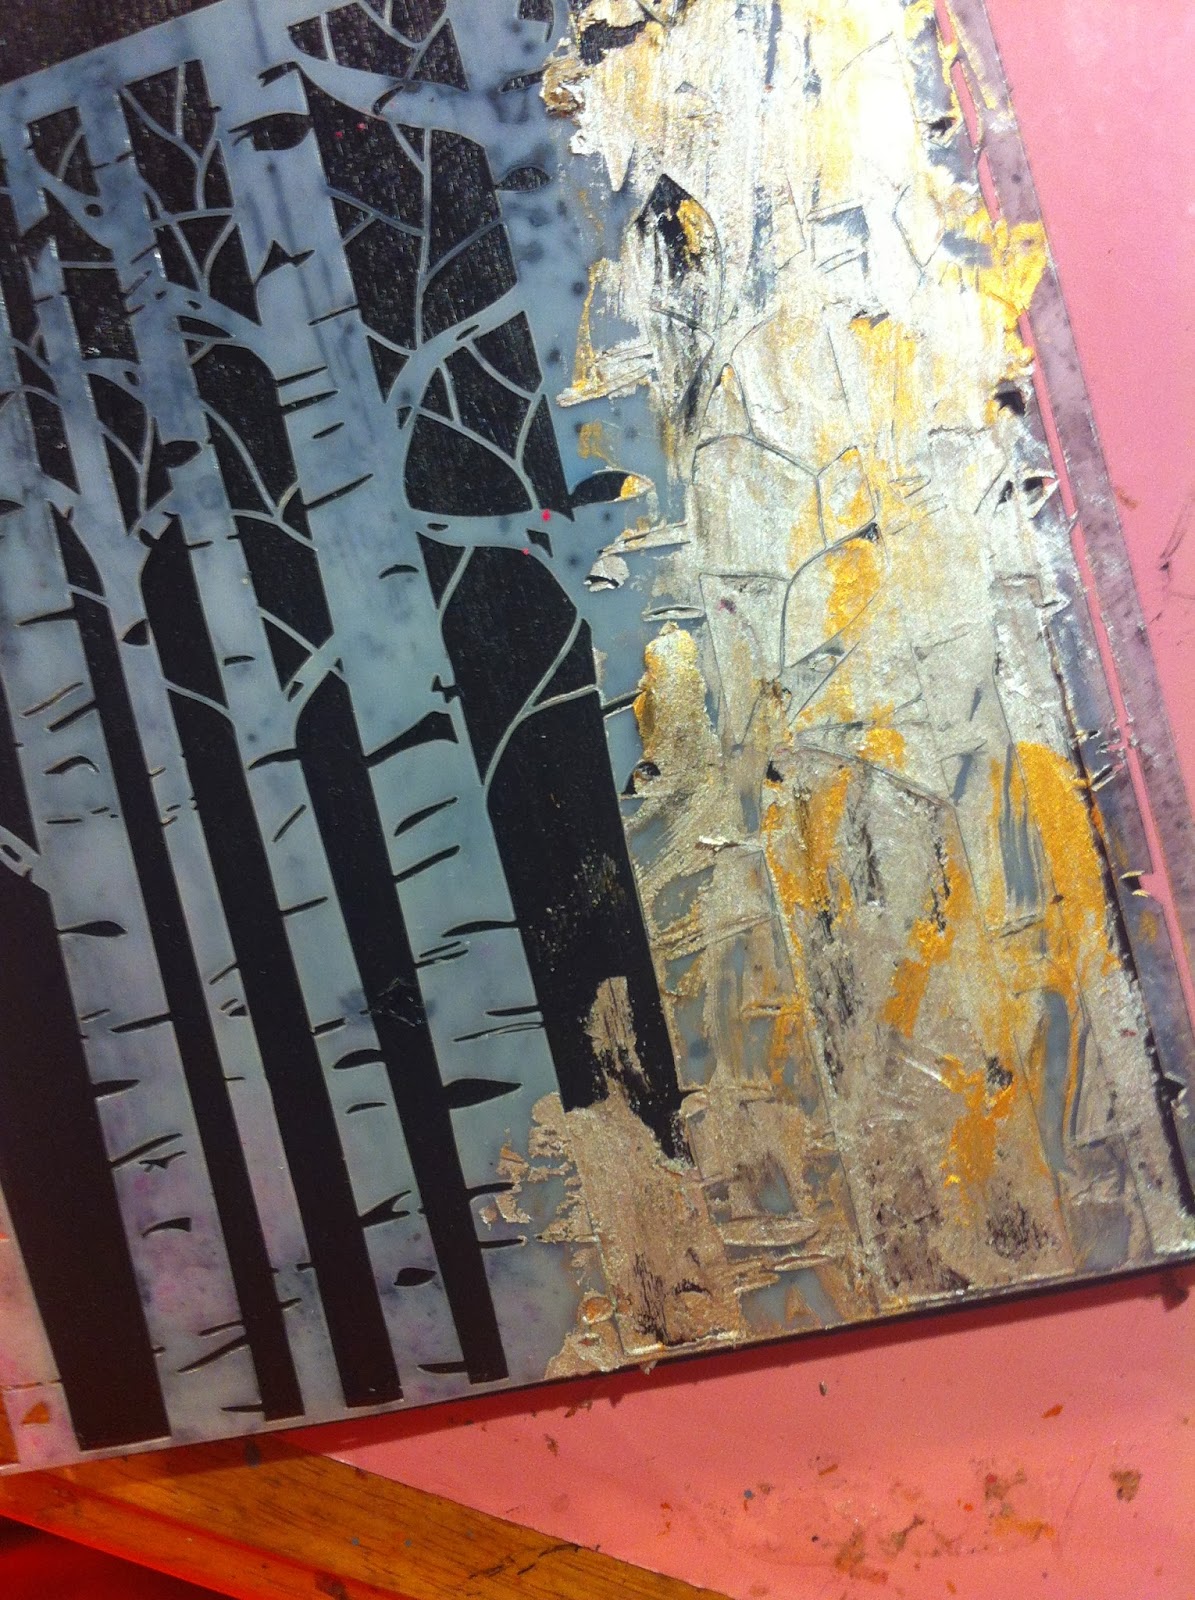
Here is a quick tutorial on how to make this background:

1) First...paint you wooden piece with acrylic paint. I actually added a little gloss medium to my 2nd and 3rd layers because I decided I wanted more gloss. You can see the difference in the finishes:


2) I used a Forrest Stencil from Crafter's Workshop (it's one of my favorites!) The size is 6x6, so it was perfect for my 5x7 piece. 


3) The medium I used for my background is Viva Inka Gold in Gold and Silver.

4) Starting with my silver, I used a putty knife to draw my rub over my stencil. I would then occasionally grabbing a little of the gold as well. Continue this process until you have covered your whole stencil. 


5) Carefully remove your stencil and your done! Inka Gold is very good for this technique because it is so thick that it doesn't seep under your stencil. As you can see, all of the edges are very crisp.


I didn't go all the way to the top because I knew I was planning a big collage of elements up there. Once my elements were in, however, you'll see that I went back in at the very top and added a little bit more with my stencil. It made the piece more "finished." 

It has been "Thrilling" being a guest designer for Authentique Paper and hope I get to do it again sometime.

Remember...you can go here-Authentique Paper Blog-for more pictures and the full blog post.

Until next time...stay creative!

XOXO,
KERI