Pages

Showing posts with label Tim Holtz. Show all posts

Tuesday, December 29, 2015

A little bird said...an easy art journal piece for The Crafter's Workshop

Hello Creatives...

It's been crazy hasn't it.

The hustle and bustle of the season can sometimes be a joy thief can't it?

Today...I"m up on The Crafter's Workshop blog with an easy art journal that I needed to refresh my busy soul one day.

Here's a sneak peek: 


For more of my thoughts and the full project, check out The Crafter's Workshop Blog:

XOXO,
KERI

Friday, November 20, 2015

Genesis 1:1 Bible Journaling

Hello Creatives! 

Well...I did it! I finally did it! I finally bought an actual journaling bible!! 


For my first entry I thought I would start...where else, but the beginning: Genesis 1:1. 


For those of you that don't know, I actually have a tattoo on my right wrist of this scripture reference: 


For me it's a reminder that the only reason I can do what I do creatively is because he first created me. That is what I wanted to document as my first entry. For the first page to always stand as a reminder of why I am journaling in the first place and who I am journaling to. 


I had so much fun with these great Alphas, labels and washi I found at Joann's for only $1 each! 


 I also used washi from Hobby Lobby, Distress Paints by Tim Holtz, DecoArt Media Misters, stencils from The Crafters Workshop and a black Sharpie. 


I hope you enjoyed today's entry!! 

Xoxo, 
Keri 

Tuesday, January 6, 2015

What's up 2015?!?!

Happy New year!!

Are you having a great year? :)

For the last few years, the beginning of a new year has brought one of my all time favorite experiences: The Craft and Hobby Association Trade Show!!

It is held each January in Anaheim, California and I have had the total privilege the last few years to be able to attend.

Alas...this year I will not be...BUT...I do have the AWESOME privilege of having 7 projects featured in the Graphic 45 Booth!

Since the week leading up to CHA is notorious for sneak peeks, G45 has been showing some new collections, one of which I got to make a project with.

And let me tell you...it is DROOL WORTHY (the collection...not my project...OK...it's pretty good too! LOL)

The collection is called "Artisan Style" and it is all about the romantic era of the 1920s and Art Deco style.

G45 showed off this picture yesterday on their blog: 


I used a vintage 7Gypsies Cathedral Window Chipboard album of my base and cut my flowers with Tim Holtz "Tattered Florals" die for Sizzix. 

Here's a few pics you didn't see on the G45 blog!


There will be more pics to come and to see the full "Artisan Style" collection, check out the Graphic 45: Sneak Peek Artisan Style

XOXO,
KERI


Thursday, April 24, 2014

Farewell...Thanks for all the Memories

It's a sad day over on the Susan K. Weckesser Blog.

My last post as a Design Team member. 


Hop on over and check it out for more details and my farewell. 


XOXO,
KERI


Friday, March 14, 2014

Graphic 45 Design Team 2014 Audition

 Hello Lifers!

Today, I have something a little different on the blog.

I decided to take a BIG leap and audition for the 2014 Graphic 45 Design Team and they require something a little different from any other DT I've ever auditioned for: a blog post dedicated to your audition projects.

Oh....and did I mention...you have to submit at least 6 (!) projects?

So grab a cup of coffee (or a glass of wine, depending on when you're reading this!), get comfy, and hopefully be inspired. :) 

Steampunk Spells

When I decided to audition, I decided to design all new projects (as opposed to using older ones) and I wanted to challenge myself to use things I had on hand.

My project featuring Steampunk Spells by Graphic 45 uses a 8 x 10 Chunky Canvas from Canvas Corp that had just not worked out. So, I turned it around and turned it into a shadowbox. 


I've always LOVED the look of Steampunk, but it's never been a style I could embrace easily. However, I think G45's use of oranges and turquoise brighten up the usual neutral steampunk pallet and made it much easier for me to work with.

My favorite part is at the center...gears from Want2Scrap that I altered using nothing but Tattered Angels Paints


Gears--naked and dressed:


So fun, right? :)

Here are a few close-ups: 
My flowers were made 2 ways: (1) the colored flowers are cut using Tim Holtz Tattered Florals Die for Sizzix from Tim Holtz Nostalgic Kraft-Core Collection from Coredinations. I then embossed it with a gear embossing folder from The Paper Studio and Distressed it with Tim Holtz Distress Ink in Walnut Stain. (2) The Metal looking flowers are cut using Spellbinders Dies and then colored using Tattered Angels paints (like the gears.)


French Country

Still feeling fall? Next up is some beautiful G45 French Country.


This project was made by doing a mixed media collage background using French Country Paper, Liquitex Matte Gel Medium and Tattered Angels Paints all on top of an 8 x 10 canvas from Hobby Lobby that I had on hand. 

I then cut about 40 flowers using Tim Holtz's Tattered Florals, wet them, scrunch them and Tattered Angels them (is "Tattered Angels" a verb? LOL)

I used a stack of mat board to lift my wrought iron piece up so that I could then tuck the flowers all around it.


Nutcracker Sweet

From Fall to Christmas!

For this project, I found an empty ribbon spool that once held 2 inch wire edge ribbon.


How "sweet" is this little scene!?

To make my 3-D scene, I fussy-cut out my characters from a sheet of G45's Nutcracker Sweet paper. I distressed them and then used pieces of bend mat board in the same of an "L" to make them stand. I was very strategic on the size and placement so the supports were not easily seen. 

A Place in Time 

G45's A Place in Time had so many options for styles-12 to be exact! Since I am tired of winter and longing for spring, I decided to use the paper for April, as well as a little throwback G45 line "Romantique."

For my base, I had this small 9 x 9 wooden tray that used to hold wooden veneers. (I've been hoarding this one for over a year just waiting for the perfect project!)

I colored my plain wood with Heidi Swapp Color Shine in Chartreuse


The green/gold color went perfecting to make this:


A few of my favorite close-ups:


The flowers are stems from Petaloo and the butterflies are from Heidi Swapp (colored with the same Chartreuse Color Shine as the base.)


Wanna guess what's in my little bottles? CHIA SEEDS! Don't they almost look like little pebbles?!

Phew! Are you doing OK? Do you need a break? 
No? Let's Keep going!

Magic of Oz

This collection has long since been one of my favorites from G45. They did a BEAUTIFUL job interpreting "The Wizard of Oz." I was so inspired by it that I made 2 projects with this collection.

First...I was inspired to make this amazing (if I do say so myself!) mini album.


From the outside, it just seems like a mini album, but the inside holds a secret...


Both the front and the back covers have 5 little flaps featuring the good on the front and then bad in the back, BUT...that's not the secret...do you see it?


All 5 of the center pieces open...making 5 even smaller albums. Each on has a small magnet to keep it closed and features one character on the cover.


Can you tell I LOVE this collection? No...then this one will change your mind.

This was the last project I made and I have to say it is one of my favorites of all time because it is so out-of-the-box...or should I say "out of the closet!"


Yup...that's a high heal shoe. It started out as an ugly plain black pump (purchased at my local thrift store for $4.) Then...came the glitter. I used the AMAZING Glitter Blast Spray Paint from Krylon in Cherry Bomb to transform it in to my own ruby slipper. 


Inside my ruby slipper is a mini tag album: 


And of course you can't talk about the "Wizard of Oz" with the Yellow Brick Road:


Or high heal shoes with bows and bling:


So there you go! My 6 audition projects for the 2014 Graphic 45 Design Team. 

To my readers...I hope you enjoyed looking at them as much as I enjoyed making them. These were definitely a labor of love. I hope to use these as tutorials soon, so check back to see how I did it!

To Graphic 45...thank you so much for this opportunity and for visiting my little blog. I hope you had fun.

To All..I will leave you the way I leave you every time we are together: Remember...choose to make your art intentional...not an afterthought. 

XOXO,

KERI  

P.S. Thank you for forgiving me for some of my pictures going outside the limits of my blog frame. I wanted my pics to be SUPER big! :)

Wednesday, March 5, 2014

Best Craft Blogger 2014 Contest!!

Hello Lifers!

AS many of you know, I had the AWESOME opportunity to attend Winter CHA in Anaheim, CA this past January (which..I still have not blogged about yet! LOL) 

While I was there, I was able to attend a blogger's networking event hosted by Prime Publishing. It was an awesome night of just meeting with manufacturers and getting to know other bloggers.

When we left...they issued us a challenge: What can you make from the manufactures you met tonight?

Winner gets crowned Best Craft Blogger 2014...oh and first prize is $1,000. :)

Sounds like a win-win, right?

I wanted to honor the companies sponsoring the contest, so I used about 85% of only their products (even though the rules said you had to use "at least one.")

Here's my project:


It includes hand-painted stenciled background and chevron heart and 3-D Burlap Flowers. 

For a complete tutorial (and of course to vote for me!) check out: FavCrafts Blogger Contest

Thanks in advance for your vote!!

XOXO,
KERI

Monday, February 3, 2014

Art Journaling on Mixed Media Monday

Hello Lifers!

It's time for a little Mixed Media on Monday! Are you ready?!

Today, we are going to be working on something that is a little new for me...art journaling! 

I have this Pinterest Board called WORD , where I pin all of these great sayings and quotes and then...what? They just sit there, occasionally pinned by others, but I never really look at them again.

So...using my One Little Word for 2014...I am CHOOSING to use them by putting them into an art journal where they are a little more accessible and so I can take time to really think about them and absorb them while I work on my art journal.  

Here is my first!


Here's a few pointers on how I made this page.

BACKGROUND 

My background is actually very simple. When I was gelli plating some paper to use for my words and my bird (I'll explain that technique in a minute), the brayer I used was covered in paint, so I simply rolled the extra pain on to my page.

To get my black chevron pattern, I used Frog Tape in their Chevron Pattern in stripes across my page. I then lightly dry brushed black acrylic paint over the entire surface. 


This is what it looks like as you're peeling it up. I LOVE the crisp lines FROG Tape gives you! (And yes...those are Mickey House PJ pants! LOL!) 

BACKGROUND TEXTURE

To add texture to my background, I did a couple of things:

1) I used acrylic paint on some of my rubber stamps instead of ink. I feel like it gave it a little more bold and solid appearance. 


The gold is a little harder to see in the pictures, but it adds some nice detail. 


You can also see that I added some stamps using Ranger's Archival Ink because it is permanent and a strong black. All of the stamps I used for this project are designed by Susan K. Weckesser for Unity Stamp Co.. They include: A little bit of Washi, Celebrate your Day, Splatter and In Circle Me. 

2) Next I stamped a vine using white acrylic paint and a Claudine Hellmuth foam stamp called "Nature" (the bird from that set is used on this page too!)

I felt like it was a little flat, so I added a little gold to the top of the leaves and some black to the bottom. 


3) Lastly, using a Hobby Lobby Stencil and Tim Holtz Distress ink in Salty Ocean, I added random blue circle all over. 


BIRD AND WORDS

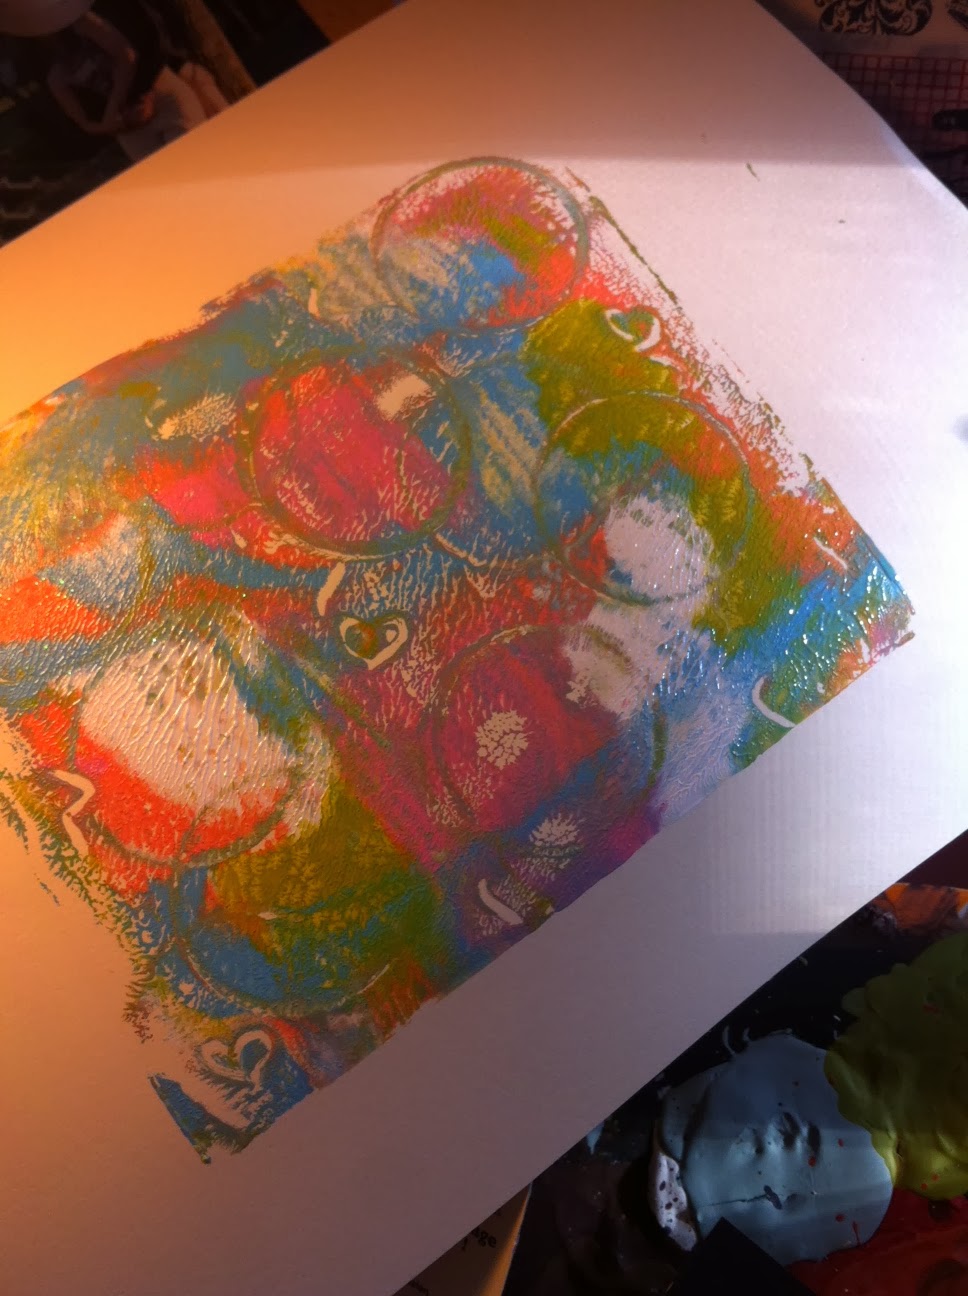
For my bird and my words, I used the same technique. It's similar to the technique called "gelli plating" but since I don't have a gelli plate (which is an actual brand and a technique) a friend of mine at Alumilite (which specializes in casting resin products) made me a fantastic on out of their Amazing Mold Rubber. The great thing about making your own from mold rubber is that you can use it for this technique as well as a surface for doing resin work!

Here is my completed "gelli" print.

This is easily obtained in a few steps:
1) Add small drops of paint to your rubber/gelli plate.
2) Run a brayer over the entire surface to smooth surface out, but not blend colors. (Remember out background? The extra paint on this step becomes the foundation for this whole project!)
3) Use random things to make impressions in your paint (lids for circles, buttons, gems.) I also used the end of a paint brush to make little hearts.
4) Place your paper over your plate and lightly brayer over the back. Keep it light or you will lose the texture you added with you found objects.
5) Carefully peal it up and let it dry!

For my bird, I knew I wanted just an out line, so I painted just the outline of my bird stamp with acrylic paint and stamped on to my dry gelli print.


My words were hand painted on another gelli print and then cut and adhered. 


I hope you enjoyed this art journaling piece. I really enjoyed making it!

Until next time...remember friends...Chose to make your art intentional...not an after thought.

XOXO,
KERI