Pages

Showing posts with label art journaling. Show all posts

Tuesday, December 29, 2015

A little bird said...an easy art journal piece for The Crafter's Workshop

Hello Creatives...

It's been crazy hasn't it.

The hustle and bustle of the season can sometimes be a joy thief can't it?

Today...I"m up on The Crafter's Workshop blog with an easy art journal that I needed to refresh my busy soul one day.

Here's a sneak peek: 


For more of my thoughts and the full project, check out The Crafter's Workshop Blog:

XOXO,
KERI

Wednesday, October 14, 2015

Gratitude Junk Journal Workshop Blog Hop!!!

Hello Creative Peeps and welcome to the Gratitude Junk Journal Workshop Blog Hop!  

Hop along with us to meet all the amazing instructors who are opening their hearts and studios to you to help us all learn more about finding gratitude in our everyday lives. AND...you have a chance to win a FREE spot for you AND a friend as well as the chance to win a GREAT prize pack! {keep reading for more information on that.}

REGISTRATION IS NOW OPEN:

If you arrived here from Tiare Smith Designs then you are in the right place. If you are starting here just follow the link below to go to the next blog and continue on the hop.

Gratitude. A feeling of appreciation or thanks. 

It seems so easy, but can be so difficult...especially with all the outside voices telling us so many other things. Through the month of this workshop, you will have the chance to find gratitude in everyday life...in ordinary things.


For me...I chose a topic that is near to my heart...literally...LOL. I chose: My Body. 

Here is a sneak peek!


Now for the good stuff.  Here is how you can win A FREE SPOT FOR YOURSELF AND A FRIEND, share my link to the Gratitude Junk Journal Workshop Page Gratitude Junk Journal Workshop , Share on Facebook, Instagram or Twitter and be sure to use #gratitudejunkjournal  and tag your friend when sharing.  Feel free to use the following button when sharing!  

One lucky winner and a friend she tags will win.  Contest is open October 14-18!  So hurry get your entries in!  Remember, #gratitudejunkjournal that is how we will find you!  And no worries, if you have already registered, your workshop fee will be refunded. Easy peasy!


Oh but wait there’s more!  Just for being an early bird registrant you have the chance to win this great prize package too!  Everyone, who signs up between 10/12 and 10/22 will be entered to win!  It’s raining prizes!  Hallelujah!  


Well it is time to move on to the next blog to see more art and learn more about our AMAZING artist instructors.  You are going to want to SIGN UP FOR THIS WORKSHOP 

Next on the hop is: Zoey Emanuela Scarpelli !!! 

Happy Hopping!  Have an AWESOME day.
Live. Love. Laugh. GRATITUDE!

Have Questions? Feel free to email me at:
thecreativelifestudios@gmail.com

XOXO, 
KERI 

Tuesday, May 5, 2015

Art Journaling with The Crafter's Workshop!

Hello Lifers!

Today, I am sharing an Art Journal Piece on The Crafter's Workshop blog where I use 3 stencils from 3 different designers to make one harmonious piece!

Here's a sneaky peaky!


For more pics and full details, check it out here: 


XOXO,
KERI

Saturday, February 21, 2015

DIY Art Journal and getting un-"Stuck"

Hello Lifers!

How are things going? Are you doing OK?

Recently, I had the the cool opportunity to mix two of my favorite things: my faith and my art.

I am doing a bible study called "Stuck" by Jennie Allen with a group of ladies at my church. We are in week 2 and in both the weeks we've done, there have been opportunities to "draw" something. However...both times...the space to draw is so itty-bitty...I could not even function. LOL 

So I decided to make my own "art journal" specifically for these 8 week study.

Here is what I came up with: 


Here's a quick step-by-step of what I did:

(1) I started with 3 plain manilla folders. I punched 5 holes in the spine with a paper piecer and then used a pamphlet stitch with nylon string to secure them together. The pamphlet stitch is super easy and useful.


(2) Add a layer of tulle and a few pieces of lace using matte gel medium.


(3) Add more embellishments and letters for your title. 


(4) Cover everything with a layer of gesso. If needed to fully cover, add a second coat. 


(5) Choose your favorite colors of spray ink.

I chose:
Tattered Angels Glimmer Mist: Monster Mash, Festive and Mallard
Heidi Swapp Color Shine: Chartruese and Primrose


Apply in light layers, one color at a time. I used all three of my Glimmer Mists, dried them and then added the darker tones on top of them to add depth.

I also splattered my Primrose Color Shine and my Mallard Glimmer Mist by unscrewing the lid and using the tube to flick the paint. 


(6) For finishing touches I:
* added some Faber Castell Design Memory Craft Texture Accents in Pearl
* TCW "Hexagon" stencil with brown acrylic paint
*Outlined my 3-D elements with Black and White Faber Castell PITT Artist Pens


I hope you enjoyed today's project and I can't wait to share more as I fill it!

XOXO,
KERI

Supply List:
Manilla Folders-Walmart
Tattered Angels Glimmer Mist-Mallard, Monster Mash and Festive
Heidi Swapp Color Shine-Primrose & Chartreuse
Faber Castell PITT Artist Pens-Black & White
Brown Acrylic Paint-Plaid
Tulle, Nylon String & Lace-Hobby Lobby
Faber Castell Design Memory Craft Texture Accents-Pearl
The Crafter's Workshop-Hexagon Stencil 
Embellishments-Prima Marketing, Jolee's, Studio Calico, 7 Gypsies
Stamps-Misc


Saturday, December 27, 2014

Art Journaling with The Crafter's Workshop

Hello Lifers!

Today is my last post for the Crafter's Workshop for 2014! Crazy, huh?

Today, I am sharing an art journal piece I recently made for my niece.


For More pics and details, head on over to The Crafter's Workshop Blog!!

XOXO,
KERI

Wednesday, November 12, 2014

Art Journaling with Marion Smith

Hello All!

Today I am so excited to be sharing a very special Art Journaling piece over on the Marion Smith Blog. 

Here's a little sneak peek: 


For full details, check out Marion's blog: 

http://marionsmithdesigns.blogspot.com/2014/11/through-air-art-journaling-featuring.html?m=1

Xoxo
Keri

Monday, October 6, 2014

Art Journaling is good for the soul

Hello Lifers! 

I haven't been blogging as much as I would like too...I'm going to try to pick it up. :)

Lately..life has been a little rough. There are a lot of outside circumstances that are weighing on my heart, but they aren't things that can be easily fixed and my personality...I'm a fix-it person. I can't stand having to stand back and watch people I love hurting. 

So...i decided to pour some of those feelings into an art journal spread. 

Why? 

Because....

Sound  familiar to your situation? 

I have a huge love for vintage music, particularly vintage hymnals, so I started looking through an old one I have and was just reading the lyrics, looking for comfort. I came across the hymn "Blessed Assurance" and the lyrics jumped off the page. 

Here is where they led me....


I used acrylic paint and Heidi Swapp Color Shine and stencil to make my background. Then I layered pieces of my hymn and allowed it to speak to me. I highlighted lines that stood out to me with a stabilo pencil. 

 
I used white gesso with a Crafter's Workshop stencil. I love this shape but once I was done, I realized it kind of looked like teeth (weird thought, I know), but then I took a closer look at the left page... 


I realized that the starburst from my Heidi Swapp stencil seems to BURST through the "teeth"...which fits perfect with the hymn title "Blessed Assurance." 

As a Christian, it's because of the Assurnace in Christ that we can break through and be triumphant no matter what the situation. 

Here is a closeup of a few other of my favorite places. 


I hope today has not only inspired you creatively, but has empowered you to take hope that no matter what the situation, you have an Assurance of victory in Christ. 

Until next time...xoxo. 

Keri 

PS. I made the quote pic using Rhonna Farrer's app, layered over a pic I took and edited with PicFX. 

Monday, February 3, 2014

Art Journaling on Mixed Media Monday

Hello Lifers!

It's time for a little Mixed Media on Monday! Are you ready?!

Today, we are going to be working on something that is a little new for me...art journaling! 

I have this Pinterest Board called WORD , where I pin all of these great sayings and quotes and then...what? They just sit there, occasionally pinned by others, but I never really look at them again.

So...using my One Little Word for 2014...I am CHOOSING to use them by putting them into an art journal where they are a little more accessible and so I can take time to really think about them and absorb them while I work on my art journal.  

Here is my first!


Here's a few pointers on how I made this page.

BACKGROUND 

My background is actually very simple. When I was gelli plating some paper to use for my words and my bird (I'll explain that technique in a minute), the brayer I used was covered in paint, so I simply rolled the extra pain on to my page.

To get my black chevron pattern, I used Frog Tape in their Chevron Pattern in stripes across my page. I then lightly dry brushed black acrylic paint over the entire surface. 


This is what it looks like as you're peeling it up. I LOVE the crisp lines FROG Tape gives you! (And yes...those are Mickey House PJ pants! LOL!) 

BACKGROUND TEXTURE

To add texture to my background, I did a couple of things:

1) I used acrylic paint on some of my rubber stamps instead of ink. I feel like it gave it a little more bold and solid appearance. 


The gold is a little harder to see in the pictures, but it adds some nice detail. 


You can also see that I added some stamps using Ranger's Archival Ink because it is permanent and a strong black. All of the stamps I used for this project are designed by Susan K. Weckesser for Unity Stamp Co.. They include: A little bit of Washi, Celebrate your Day, Splatter and In Circle Me. 

2) Next I stamped a vine using white acrylic paint and a Claudine Hellmuth foam stamp called "Nature" (the bird from that set is used on this page too!)

I felt like it was a little flat, so I added a little gold to the top of the leaves and some black to the bottom. 


3) Lastly, using a Hobby Lobby Stencil and Tim Holtz Distress ink in Salty Ocean, I added random blue circle all over. 


BIRD AND WORDS

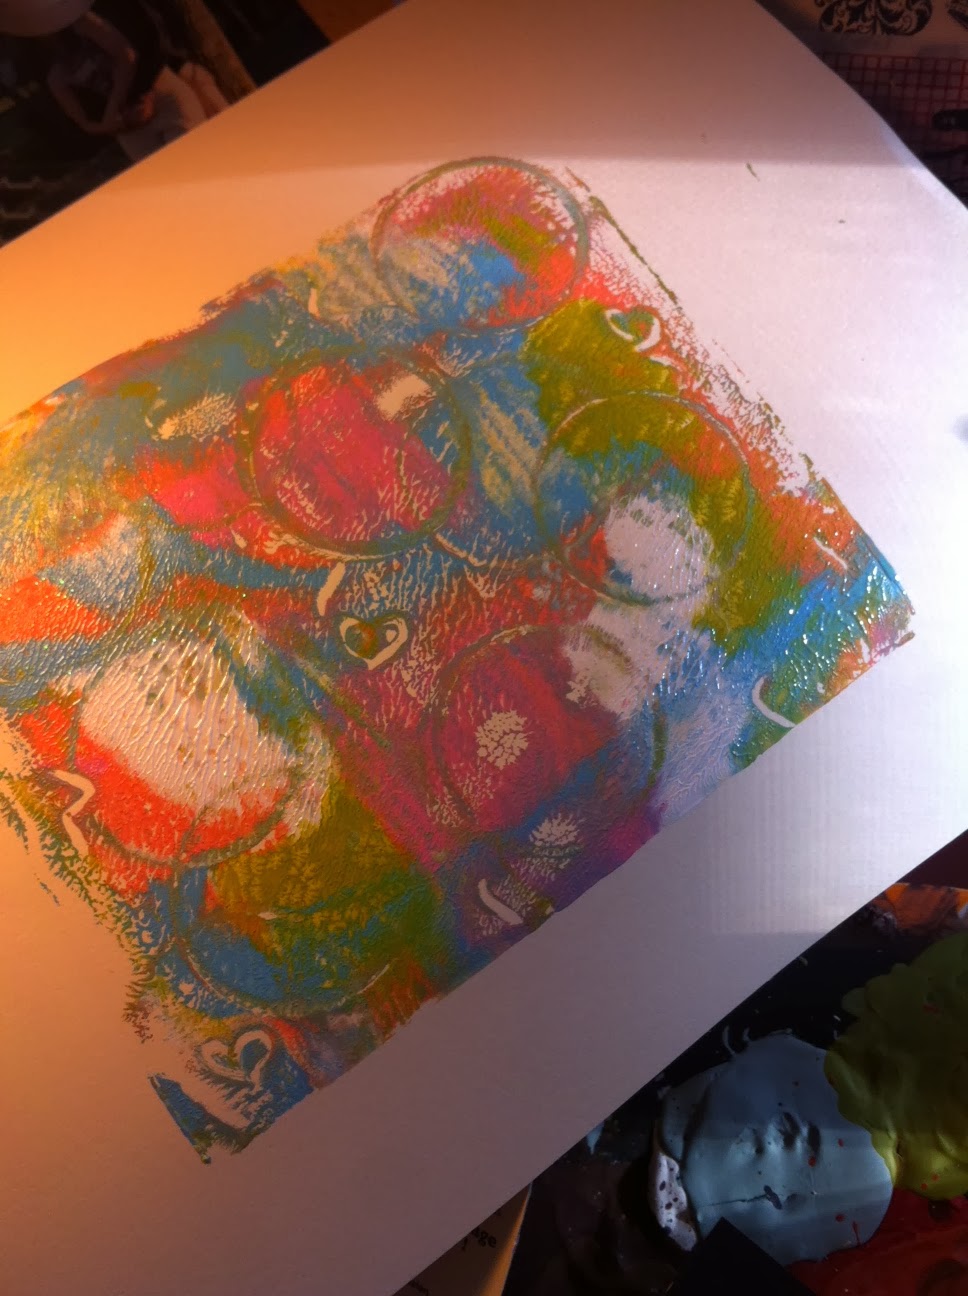
For my bird and my words, I used the same technique. It's similar to the technique called "gelli plating" but since I don't have a gelli plate (which is an actual brand and a technique) a friend of mine at Alumilite (which specializes in casting resin products) made me a fantastic on out of their Amazing Mold Rubber. The great thing about making your own from mold rubber is that you can use it for this technique as well as a surface for doing resin work!

Here is my completed "gelli" print.

This is easily obtained in a few steps:
1) Add small drops of paint to your rubber/gelli plate.
2) Run a brayer over the entire surface to smooth surface out, but not blend colors. (Remember out background? The extra paint on this step becomes the foundation for this whole project!)
3) Use random things to make impressions in your paint (lids for circles, buttons, gems.) I also used the end of a paint brush to make little hearts.
4) Place your paper over your plate and lightly brayer over the back. Keep it light or you will lose the texture you added with you found objects.
5) Carefully peal it up and let it dry!

For my bird, I knew I wanted just an out line, so I painted just the outline of my bird stamp with acrylic paint and stamped on to my dry gelli print.


My words were hand painted on another gelli print and then cut and adhered. 


I hope you enjoyed this art journaling piece. I really enjoyed making it!

Until next time...remember friends...Chose to make your art intentional...not an after thought.

XOXO,
KERI