Pages

Showing posts with label diy. Show all posts

Friday, October 23, 2015

DIY Adult Coloring Book Pages

Hello Creatives!

Have you jumped on the coloring book bandwagon?

Today on The Crafter's Workshop, I show you how to take your coloring book pages to another level by making your own!

Here's a sneak peek: 

Head on over to The Crafter's Workshop blog for full details!!


XOXO,
KERI 
Saturday, February 21, 2015

DIY Art Journal and getting un-"Stuck"

Hello Lifers!

How are things going? Are you doing OK?

Recently, I had the the cool opportunity to mix two of my favorite things: my faith and my art.

I am doing a bible study called "Stuck" by Jennie Allen with a group of ladies at my church. We are in week 2 and in both the weeks we've done, there have been opportunities to "draw" something. However...both times...the space to draw is so itty-bitty...I could not even function. LOL 

So I decided to make my own "art journal" specifically for these 8 week study.

Here is what I came up with: 


Here's a quick step-by-step of what I did:

(1) I started with 3 plain manilla folders. I punched 5 holes in the spine with a paper piecer and then used a pamphlet stitch with nylon string to secure them together. The pamphlet stitch is super easy and useful.


(2) Add a layer of tulle and a few pieces of lace using matte gel medium.


(3) Add more embellishments and letters for your title. 


(4) Cover everything with a layer of gesso. If needed to fully cover, add a second coat. 


(5) Choose your favorite colors of spray ink.

I chose:
Tattered Angels Glimmer Mist: Monster Mash, Festive and Mallard
Heidi Swapp Color Shine: Chartruese and Primrose


Apply in light layers, one color at a time. I used all three of my Glimmer Mists, dried them and then added the darker tones on top of them to add depth.

I also splattered my Primrose Color Shine and my Mallard Glimmer Mist by unscrewing the lid and using the tube to flick the paint. 


(6) For finishing touches I:
* added some Faber Castell Design Memory Craft Texture Accents in Pearl
* TCW "Hexagon" stencil with brown acrylic paint
*Outlined my 3-D elements with Black and White Faber Castell PITT Artist Pens


I hope you enjoyed today's project and I can't wait to share more as I fill it!

XOXO,
KERI

Supply List:
Manilla Folders-Walmart
Tattered Angels Glimmer Mist-Mallard, Monster Mash and Festive
Heidi Swapp Color Shine-Primrose & Chartreuse
Faber Castell PITT Artist Pens-Black & White
Brown Acrylic Paint-Plaid
Tulle, Nylon String & Lace-Hobby Lobby
Faber Castell Design Memory Craft Texture Accents-Pearl
The Crafter's Workshop-Hexagon Stencil 
Embellishments-Prima Marketing, Jolee's, Studio Calico, 7 Gypsies
Stamps-Misc


Wednesday, January 7, 2015

Inspirational Art with The Crafter's Workshop

Hello Lifers!

Today on The Crafter's Workshop blog, I am sharing this quick and inexpensive inspirational plaque: 


Check out The Crafter's Workshop BLOG for a full Snapguide tutorial.

XOXO, 
KERI
Monday, December 22, 2014

Last Minute Gift featuring Marion Smith Mad Tea Party

Hello Lifers!

Christmas is FAST approaching. 

Do you still need a quick last minute gift?

Check out Marion Smith's Blog today for a little DIY project I came up with that can easy be done in 30 minutes for less.

Here's a little sneak peak:


For more pics and full details, check out Marion's Blog!


XOXO,
KERI 

Monday, June 16, 2014

Betty the Glamper...she's almost done!!

Good morning lifers! 

I hope you had a fabulous weekend...I know I did! 

As many of you know, we recently bought an old pop-up camper and decided it needed a little love (not everyone is down for fake wood and a rainbow of country mauves and blues.) 

Today, I wanted to show you some updated pics! I spent most of last week at my sewing machine making her new curtains, pillows and covering the ugly cushions. 

In total, I made 8 pillows, 9 curtains and recovered 6 cushions...I don't think I have sewed this much in my entire life. Lol. 

Oh...did I mention her name was Betty? Why Betty? Well, my sister (who we are traveling with in a few weeks) is redoing her camper as well and we wanted their names to be "related" somehow. We thought about starlets or maybe Wilma and Bett or Starlight/Starbright, but eventually we landed on: BETTY AND VERONICA!! It's actually pretty perfect for our personalities and the looks of our campers. 

Wanna see?  


I fell in love with this big stripe because it felt like the old changing "tents" that you used to find at beaches back in the day. The stripes, coral pattern and anchor pattern materials all came from Hobby Lobby. The navy blue sailboat and the cushion fabric both came from Hancock in the Home Decor Section. 

Wanna money saving tip?! For pillows, don't buy pillow inserts! They can cost anywhere from $8-$15 each. Instead, go to your local thrift store and buy ugly throw pillows (the uglier they are the cheaper they are and the funnier looks you'll get at check out! Haha!) throw them in your dryer on the sanitize cycle (or high heat if you don't have a fancy dryer.) Then simply cover your pillows for a fraction of the cost. My 8 pillows cost a whopping $16 at my local thrift store. 


You can see on the top of this curtain, I added a strip of the cushion fabric to the too. I did this for 2 reasons: (1) it ties the whole thing together and (2) my striped fabric was about 10in too short for the length I needed and I was not about to try to line up all those stripes to add more of the same fabric! 

We painted 2 coats of Valspar primer and paint all in one over the ugly faux wood. We chose the outdoor version since the camper will have to endure temperature changes. The white REALLY brightens the whole thing up and is a really cheap and simple change. We bought just a quart and didn't even use the whole thing. 


I love how my brighter colors POP of my darker cushions. Plus...better for stains! 

If you're thinking about Glamping (glamour + camping) here's a few money saving tips we've found along the way! 

(1) like I said above...instead of buying new pillow inserts, buy used throw  pillows at your local thrift store and recover to match. Just remember to check them closely for scary stains and santize them in your dryer. 

(2) remember your space is small. You might be used to buying gallons of paint, but 1 quart is more than enough for your little space. 

(3) Check what you have in hand already! We all have gallons of paint leftover from various projects. You might have what you need sitting your garage right now. We painted the vent covers gray (sorry no pics of them!) using a gray spray paint we already owned. (We learned this lesson the hard way...we totally had paint sitting in our garage that we could have used!)

(4) Check your local Habitat for Humanity Restore or other similar charity store that specializes in home products. We were looking at new handles (we needed 8) at a big box home improvement store and the ones we liked were $3-$5 each. Uummm....no. My hubby went to our local Restore and found them for $1 each. Much better right?

(5) don't forget the coupons on the fabrics! Hancock Fabrics has coupons and sales through their website and in print, while JoAnn's and Hobby Lobby both have apps. Look closely though...usually the coupon can only be used on one "cut" of fabric, so it might require multiple trips or a helper to go through a different line to get the savings.

(6) When it comes to fabric, spend a little more for your cushion fabric. It's gonna get a lot of use. For pillows and curtains, a canvas or duck cloth works great because it's sturdy, but not too expensive. 

So there you go....Betty is about 80% done. I can't wait to show you the finished project and the pics of her in action in just a little under 2 weeks. 

Have an awesome day and remember...make your art intentional...not an after thought. 

Xoxo, 
Keri 

Tuesday, April 15, 2014

The Creative Life and Authentique Paper

Hi Lifers!

Today I am super excited to be joining with one of my favorite paper companies, Authentique Paper.

I have loved them since I first laid eyes on them and last October when their social media person asked if I would like to be a Guest Designer, I of course jumped on it! I had a blast working with their Halloween line.

Then at CHA this past January they asked if I would again, I was so excited, especially when they asked me to use their new Classique:Elegant line.

Want a sneak peek?


Want more?

Hope on over to Authentique's Blog for more pictures, details and more projects featuring 
Classique: Elegant. 

Thanks for stopping by and remember...make your art intentional...not an afterthought. 

XOXO,
KERI

Friday, March 28, 2014

Getting Blingy with The Buckle Boutique

Hello Lifers!

Today I want to share something super fun with you!

At Winter CHA this past January, I had the opportunity to meet Cathie from a little company called The Buckle Boutique.

They were debuting this new product they called Rhinestone Resin Self-Adhesive Sheets. These rhinestone sheets have something no other rhinestone sheet  (that I know of) has ever had...the ability to be CUT into anything you want them to be. They can be cut with scissors, craft knifes and even your Cricut.

I was so honored that Cathie wanted to send me a couple of sheets to see what I could come up with.

Here's a couple of things I came up with:


This started out as an MDF Chest of Drawers from Kaisercraft. With the sheets being self-adhesive, I just cut a piece slightly larger than my piece, adhered it to the side and then used my craft knife to trim it. My craft knife went through it with no problems!

Here are a few closeups. 


To make my chevron, I used a chevron punch my Emaginations (sorry...this company is out of business) and cut pieces from my rhinestone sheets and laid them next to each other to form my chevron stripe. (YES! You can cut them with a punch!!) 


The rhinestones sheets were also perfect to make some sweet, quick and simple pendents. 

Cut a piece of Rhinestone Sheet to size and adhere it to your bezel. Then glue a simple embellishment to the center and you're done! What is fun about this pendent is that it is actually double sided! So no matter which way it is flipped, there is something fabulous!


Here are a couple of my favorite tips for working with The Buckle Boutique's Resign Rhinestone Self-Adhesive Sheets:

(1) When using a punch, flip the punch over so that you can make sure that the lines on your stones are straight. 

(2) If you are trying to cover a surface like my Chest of Drawers, it is much easier to cut your sheet just slightly larger than your piece, adhere it and then trim with your craft knife. 

(3) For jewelry, use an ink to stamp your bezel shape on the back of your Rhinestone Sheet. Cut just inside your line and you will have the perfect shape without all the guess work. 

My next plan....cut out some shapes on my Cricut!

I can't wait to share them with you.

For more information and to see all of the fabulous designs, check out The Buckle Boutique. 

Until next time...remember...make your art intentional...not an after thought.

XOXO,
KERI

Thursday, March 6, 2014

Double Down Thursday...WHAT?!

Hello Lifers!

Well...this has never happened before, but I am on 2 BLOGS ON THE SAME DAY!

WHAT THE WHAT?!

Here's a little info on both...be sure to click through links for more info and photos!

SUSAN K. WECKESSER

It's my day over on the Susan K. Weckesser Blog!!

Today, I am sharing this great project featuring Susan's Whimsical Paper and Heidi Swapp's Memory Files.


You can check out the full details over at Susan's Blog: My Sweet Earth,

BELLA CRAFTS QUARTERLY

For those of you not familiar with Bella Crafts Quarterly it is a quarterly online craft publication that is completely FREE!! Yes...FREE! Want it printed? The lovely ladies of Bella Crafts will print it and ship it for just the cost of printing and postage. 

Today, I have the honor of being a guest blogger on their blog.

I am sharing this amazingly thrifty spring wreath that I made for $15...including spray paint!


Check it out here-Bella Crafts Quarterly Blog-for a complete tutorial and price breakdown!


Enjoy!!

XOXO,
KERI

Friday, December 20, 2013

Quick and Sweet Gift over on the Susan K. Weckesser Blog!

I'm always super excited when it's my day on the Susan K. Weckesser blog!

Head on over there today and see my quick and sweet last minute gift idea...the beautiful altered bottle (in it's former life it was a maple syrup bottle from The Fresh Market!)


Tuesday, December 17, 2013

Sometimes things just don't go as planned...

Did you ever decide to take a leap and then things just didn't work out as planned?

Well that happened to me recently. 

I decided to try and participate in a small craft fair that was being held at my kid's school. I bought the materials and spent hours and hours making projects. I was set to go!

Then...snowpocalypse hit, keeping us home-bound for 6 days and due to reschedule events, they ended up canceling the event. UGH!

In the beginning I was a little sad that I had spent all this time and money and now what was I going to do with all of these great things I had created.

Then...I thought...ETSY!

So I decided to take my failed plan and give it a little tweek!

My etsy shop will be for many projects you have seen on my blog and other blogs.

Ready to shop? 


Below are some of the projects from the canceled show...just to tease!

XOXO,
KERI


Friday, December 13, 2013

Pin-Win-- DIY Light Box

If you're like me, you love Pinterest, but rarely actually do anything with them. 

However, today I wanted I share my most successful "PIN-WIN" 


This pin leads you to a tutorial on how I make this easy and amazing DIY Light Box. 


My hubby made the base of mine using the box from a new piece of furniture we had just bought. 

Here is mine: 


My studio table is a 6ft old dining room table. The canvas you see is an 8x10, so you can see that it is easy to accommodate large projects if you make your frame larger. (This picture makes my canvas look like it's floating! Lol) 

Check out the tutorial by Flax and Twine. I'm sure you'll love it! 

And thanks Flax and Twine for a great and easy to follow tutorial. 

Xoxo

Keri

Tuesday, October 22, 2013

My Day...with Authentique Paper!

Jazzed...Excited...Freaked Out...Stoked...Ecstatic...

All these describe how I feel today.

I have the HONOR of being the featured Guest Designer today for on of my favorite companies Authentique Paper.

If you are a follower of scrap companies, you know that Authentique has only been around a few years, but has really made a SPLASH in a short time. Their patterns and colors are versatile, while the texture and weight of their paper makes them VERY easy to work with and do all types of crafts. Their stickers sheets (they call them "details") comes with words, alphas and every kind of embellishing sticker combo you would ever need!

For this guest spot, I was sent their "Thrilling" Collection. Full of a variety of oranges and vintage images, it was a lot of fun to play with.

For the complete post, head on over to Authentique Paper's Blog.

Here are a few more pics that didn't make it into the post and a quickie tutorial!

First UP... 
My "Thrilling" Shadow box


The "shadowbox" is actually a fake. It's just a chunky 12 x 12 canvas, turned backwards!

The frames and bow are made from dies by Vicki Chrisman for Accucut and the bottles are 7Gypsies.

Everything else is just paper, glue and Authentique Details Stickers.

Here is a couple of new closeups!


NEXT...
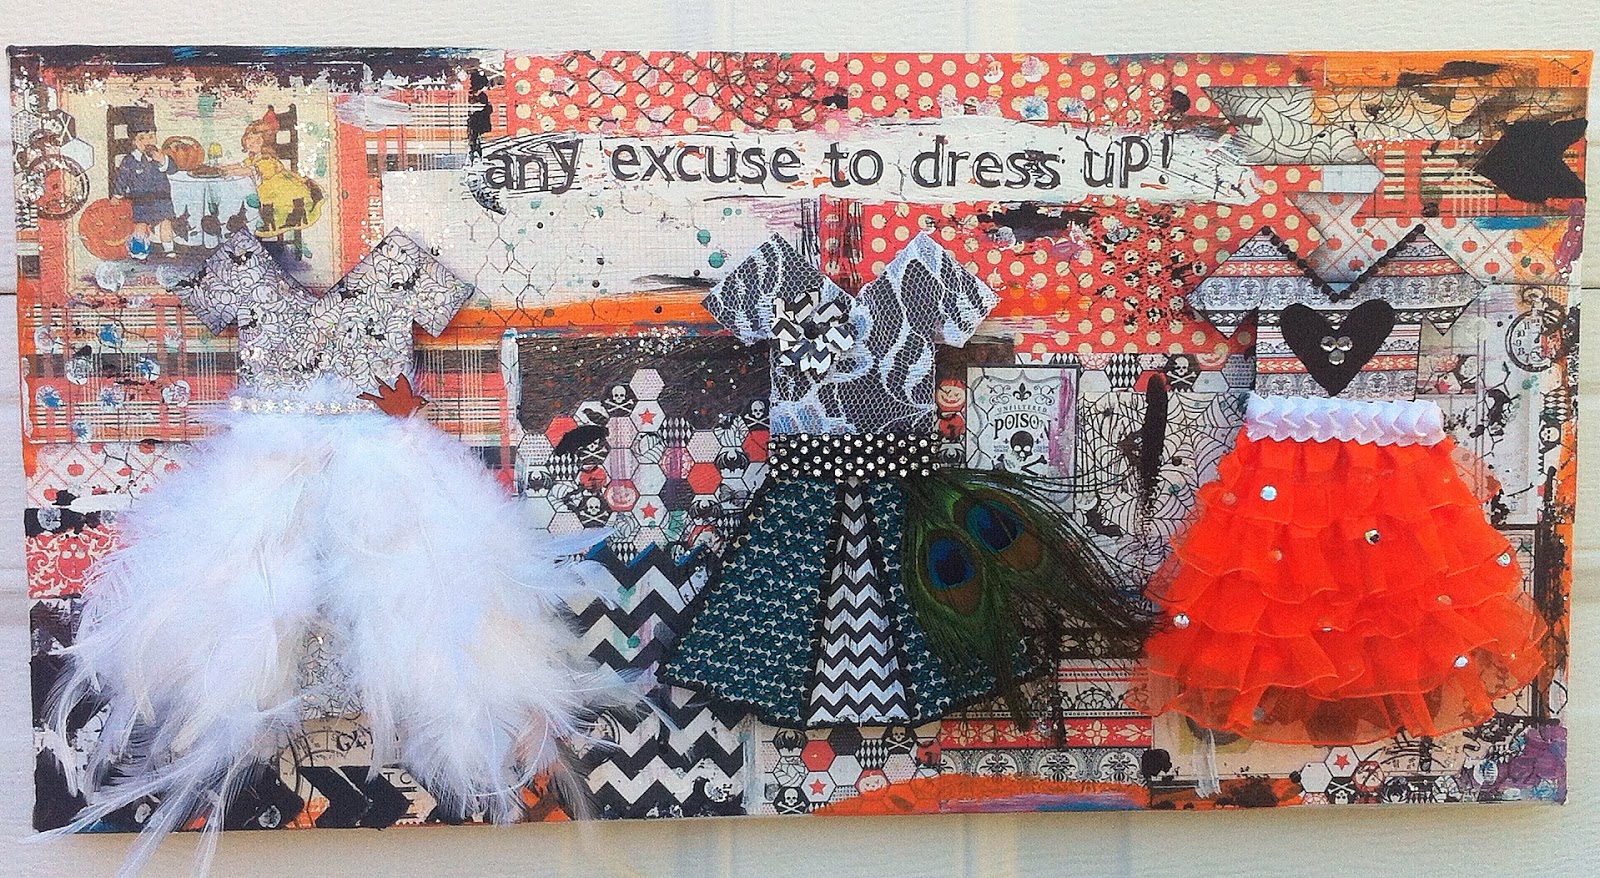
"Any Excuse to Dress Up" Mixed Media Canvas


I really wanted to do one piece that was just crazy and fun. 

I started out by making a 5 Origami Dresses from the Authentique 6 x 6 pad from the "Thrilling" Collection.

My original idea was a little different, but when I decided on this 20 x 10 canvas from Hobby Lobby, I decided to narrow my dresses to just 3.

Here is where I found my tutorial for my dress: Origami Dress Tutorial. It was my favorite out of all the ones I checked out.

A little tip here...during the step where you are folding up to make the bodice, flip the project over to make sure your bodice is all enough for your project. Mine was not and I actually cut the tops off my origami dress and hand-cut new ones.  Took some time...don't make my mistake! LOL. 

All of the dresses are set on a stack of corrugated cardboard scraps to give them height off the canvas.

Here is a close-up of all three dresses:

It's hard to tell in picture, but for the Peacock Dress, all the turquoise you see on the skirt is bling that I bought at Hobby Lobby. The fact that it came in long "sheets" of 10 x 60 helped fill the skirt in pretty fast. 


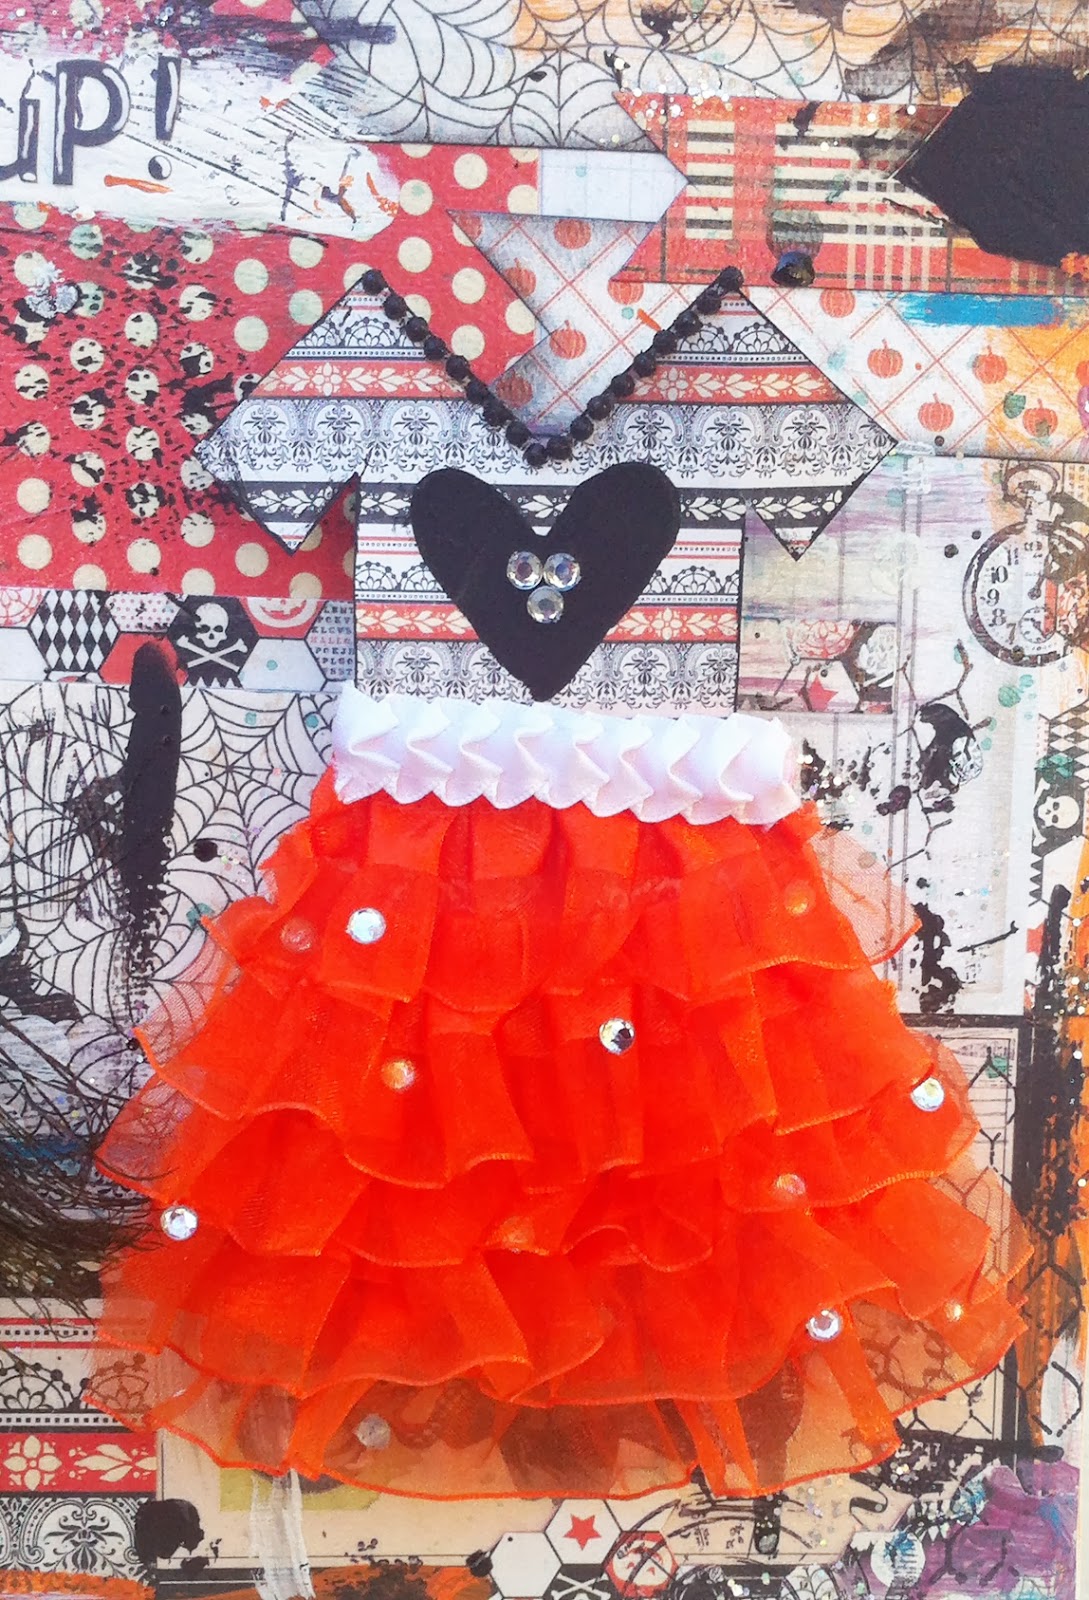
This skirt is made of layered ruffle ribbon, loose bling and some additional ribbon. The heart on the shirt was made with Modeling Paste and a Heidi Swapp Stencil.  


This is my favorite! Think: Couture Bride of Frankenstein. She's got her pats and spiderweb's that are covered in glitter glue, tons of loose feathers make up her skirt, along with a "diamond" waistband and orange birdie for good luck. 

For the background, I Modged Podged paper from the "Thrilling" Collection, before splattering and painting it up with glitter glue, acrylic paint, Tattered Angels and Modeling Paste colored Black through a Heidi Swapp Stencil.

Lastly....
"Monsters in the Trees"


Here is a quick tutorial on how to make this background:

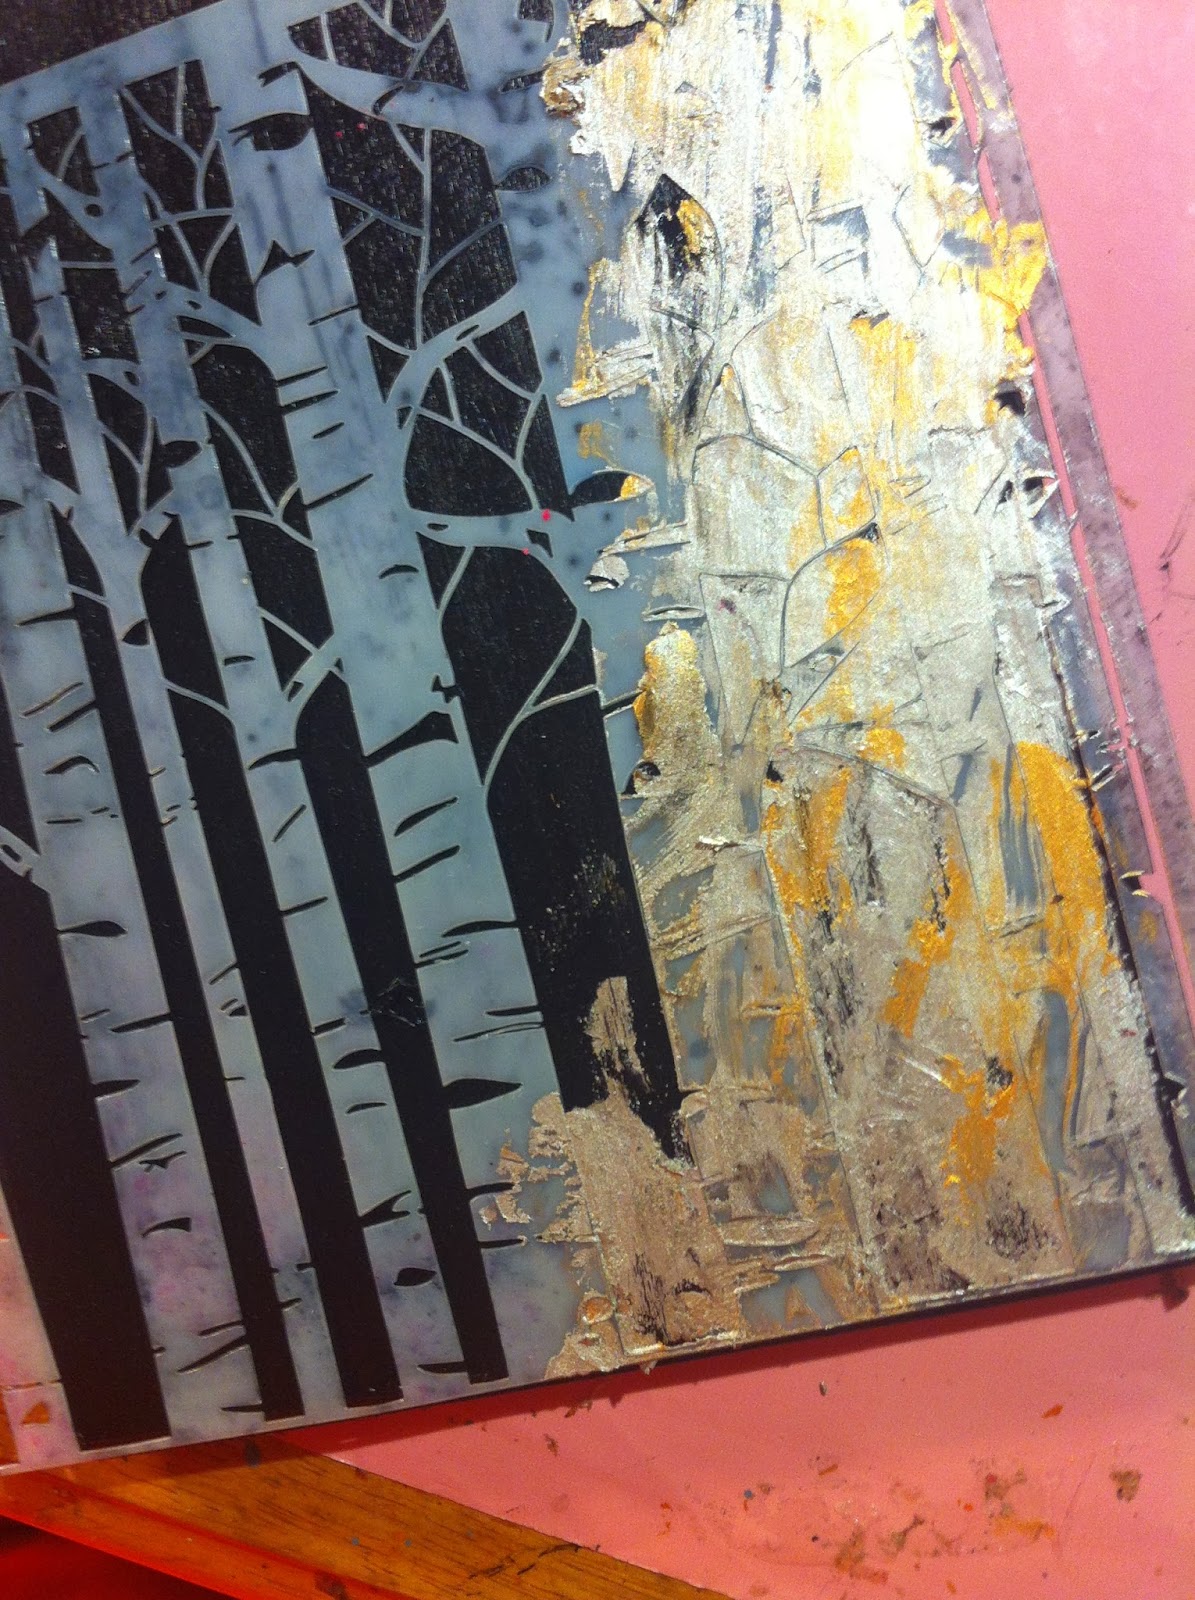
1) First...paint you wooden piece with acrylic paint. I actually added a little gloss medium to my 2nd and 3rd layers because I decided I wanted more gloss. You can see the difference in the finishes:


2) I used a Forrest Stencil from Crafter's Workshop (it's one of my favorites!) The size is 6x6, so it was perfect for my 5x7 piece. 


3) The medium I used for my background is Viva Inka Gold in Gold and Silver.

4) Starting with my silver, I used a putty knife to draw my rub over my stencil. I would then occasionally grabbing a little of the gold as well. Continue this process until you have covered your whole stencil. 


5) Carefully remove your stencil and your done! Inka Gold is very good for this technique because it is so thick that it doesn't seep under your stencil. As you can see, all of the edges are very crisp.


I didn't go all the way to the top because I knew I was planning a big collage of elements up there. Once my elements were in, however, you'll see that I went back in at the very top and added a little bit more with my stencil. It made the piece more "finished." 

It has been "Thrilling" being a guest designer for Authentique Paper and hope I get to do it again sometime.

Remember...you can go here-Authentique Paper Blog-for more pictures and the full blog post.

Until next time...stay creative!

XOXO,
KERI

Sunday, August 11, 2013

Throwing a Perfect Themed Birthday Party

I LOVE to throw parties. I don't care if it's a kid's party...adult party...baby shower...whatever!

We were so blessed 2 years ago to be able upgrade from our LITTLE 3 bedroom/1 bath house (for 5 people and a dog!) to a substantially larger house that allows my husband and I to have more than 1 family at a time over for fun (a feat that was totally NOT doable at our other house.)

My favorite kind of party to throw is a themed party, where I can just go crazy overboard with imagination and think of fun ways to incorporate theme into EVERYTHING!

Today...I want to share with you some of my FAVORITE things I've done at a couple of my son's last birthday parties and I hope they inspire you to go OVERBOARD with the fun for your next party!

LEGO STAR WARS
This was the theme of my son's 9th birthday last year. 

My favorite way to "go with the theme" is to name all of our snacks after show/theme.

For our Star Wars theme, I made these little bursts in Word and added the names of our treats. I found the Star Wars font here for free: Star Wars font for DaFont.com


Here's a list of a few of our snacks:

Wookie Cookies: Chocolate Chip Cookies
Space Rocks: Chocolate Candy Rocks
Yoda Soda: Green Party Punch (Lime Sherbet and Sprite)
Jaba Jelly Beans: Green Pear Flavored Jelly Beans
Light Sabers: Multi-Colored Twizzlers
Senator Pop-a-Teen: Pop Corn
Chocolate Space Balls: Silver Chocolate Balls
Lunar Legos: Candy Building Blocks


I went old school to make a Death Star Pinata.


 I used a large "punching" balloon and covered it with a paper towels (because once I started this I realized I didn't have any newspaper-Fail! LOL) dipped in a flour a water mixture (see....old school!) 

Once it dried I popped the balloon, made dent for the dent in the Death Star (this also hid the slit I made to shove candy in), spray painted it silver and added a few black accents with a marker. My hubby rigged a hook in it so we could hang it.

Our "light sabers" were just pool noodles cut in half an decorated with duct tape and electrical tape to resemble the handles of real light sabers.


We couldn't find a blind fold, so of course...we used a Santa Hat!!! 


AVENGERS ASSEMBLE

This year my son wanted an Avengers Party, but since we were having it in the middle of our CRAZY summer, I didn't have as much "planning time" as usual. BUT...we made the best of it and this is what we came up with!


Can you tell I like coming up with themed snacks!? LOL. My favorite this time was the "Thor-e-os." They were even "blonde" just like every one's favorite viking!


I found these cute masks at Walmart, so everyone got to pick their favorite character. My only problem? No Black Widow! BBOO!


Even super heroes gotta eat!

My favorite part of this party was this....

HULK SNOT!!!

We made Gak and dyed it VERY green, just like every one's favorite grumpy green guy.


I highly recommend doing this outside (we're on our driveway) because it can get a little messy. Plus, using disposable stuff helps with clean up because...let's be honest...you probably won't have any help.

Here is the recipe I used for Gak: 

It was perfect timing because back to school supplies were plentiful and on sale. :)

We also had a Avengers Water Balloon war, but I was too busy trying not to get wet to take pictures!

7 Perfect Party Tips to Remember:

1) Let your child be involved! You might not like the theme, but they (and their friends) will. My daughter last year for her 5th birthday wanted a Power Ranger's Samurai Party. Did we have a Power Rangers Samurai Party? Yup...complete with a viewing party of her favorite episode.

2) Naming snacks after your theme is the easiest (and funniest!) way to have your theme everywhere!

3) There is no need to go crazy with themed decorations. I pick 2-3 items that support my theme, like the table covering and the cake, and then all my other decorations support the color scheme. This is MUCH cheaper, plus you can save decorations to use again (have you noticed A LOT of boy themes are red and blue?)

4) Don't think you're creative? Google...Pinterest...that CRAZY creative friend...use your resources! BUT...

5) Remember...you don't have to have a crazy, ridiculous expensive party for your child to enjoy it and have the memories. Set a reasonable budget and work your plans around that. Feeding everyone not your budget? Have your party mid-to-late afternoon. No one will expect anything other than cake and a drink because they would have just eaten lunch or would be getting ready for dinner. Don't have money for a craft and a goodie bag? Have kids decorate a canvas bag with fabric markers or paint...it's their craft and their "thank you" present.

6) You will be too busy playing hostess with the mostest...ask a friend or another parent to play paparazzi for you so that you don't miss the memories while you're trying to keep the party going.

7) That being said...ENJOY Yourself!!! Take a minute to marvel at your hard work and the smiles on your party-goer's faces. Take a minute to hug your birthday boy or girl and tell how blessed you are to have them. (And get a picture of it! LOL!) Take a minute to remember why you did all this hard work and be proud of yourself.

So what do you think? Are you inspired to go a little overboard-crazy at your next birthday party?

I can't wait to see what you are inspired to do. Leave me a comment with a link to YOUR crazy-overboard fun party!

Until next time friends...keep being creative. 

XOXO-KERI