Pages

Showing posts with label Blog. Show all posts

Tuesday, February 2, 2016

It's time to take a giant JUMP...are you ready?

Hello Creatives!

I am so BEYOND excited to be announcing this...

As many of you know, my One Little Word for 2016 is JUMP: 


One of my first big JUMPS of 2016 was to launch my VERY OWN SITE!!

WHAT!?

YES... The Creative Life Studios has a new home on the web:


I will be leaving this blog up so that you all can see my old projects and tutorials and have a link on my new site to easily get you back here.

I hope you will check out my new blog and leave me some love when you do!

XOXO,
KERI 

Sunday, January 17, 2016

Life is messy....Bible Journal about it.

Good Morning Creatives!

How are you doing on this beautiful Sunday? Here in Arkansas it's super chilly with a chance for snow. BBBRRRR.

Today, I am up on The Crafter's Workshop blog with Part 2 of my "How to use a TCW Stencil to make your own stamp."

Did you miss Part 1?

You can see the full article here: How to Make Your Own Stamp with TCW Stencils.

And the complete Snapguide right here!


Check out How to Use a TCW Stencil to Make Your Own Stamp by Keri Sallee on Snapguide.

For Part 2, I wanted to use my new stamp in a Bible Journaling piece. I used the verse 2 Samuel 22:30 that says "With my God I can jump over any wall." 


I wanted to show the messy life can be with my design, but the scripture is the supports the thought that no matter how messy life gets....with God we can "Leap over walls."

Here is a closeup of the stamp we carved in Part 1. 


Head on over to The Crafter's Workshop Blog for more details AND a complete video!


Leave me some love! I would love to see your stamps and your bible journaling pages!

XOXO,
Keri Sallee


Monday, January 19, 2015

Stamping Techniques with Graphic 45

Hello Lifers!

I have to admit...although I own a lot of stamps, I don't consider myself a "stamper." I like graphic stamps that can be used over and over without looking the same. I think I think "stamp" and I think I have to make a card! LOL

Today, on the Graphic 45 blog, I am sharing a stamping technique that allows you create your own resist background!

Here's a little sneak peek:


For more pictures and the complete Snapguide, 
you can click here----> Graphic 45 Stamping Techniques

Have an awesome day!!

Xoxo,
KERI


Friday, December 26, 2014

Graphic 45 Christmas Ornaments...How did I forget this!?

OH my word Lifers!!

Last weekend we for my husband's family Christmas, we rented a house in Branson, MO. It...was...awesome! No one had to clean their house...it was so huge that the kids could be else where in the house and the adults could actually converse without interruption. (GASP! LOL)

While I was doing family time, I totally forgot to share my ornament on the Graphic 45 blog!


Here's a sneak peek!

For more info and pictures, head on over to the Graphic 45 Blog.

Even though it's christmas now...this little ornament can easily be translated into any holiday!

XOXO,
KERI 

Sunday, August 31, 2014

Hello Update!

Hello Lifers!

I hope you are all doing amazingly well.

I have been crazy busy and although I've been around on other blogs, it's been a little bit since I updated my own. (isn't that just the way it goes!)

Here's what I've been up to:

Marion Smith Designs

This month, I had two projects featured on Marion Smith Design's blog.

The first was a simple, but beautiful project using Ultra Thick Embossing Enamel, Water Colors, Vintage Sheet Music and Marion's "Curious" Stamp Set. 


You can see the full tutorial here: Stamping Gold with Curious Stamp Set

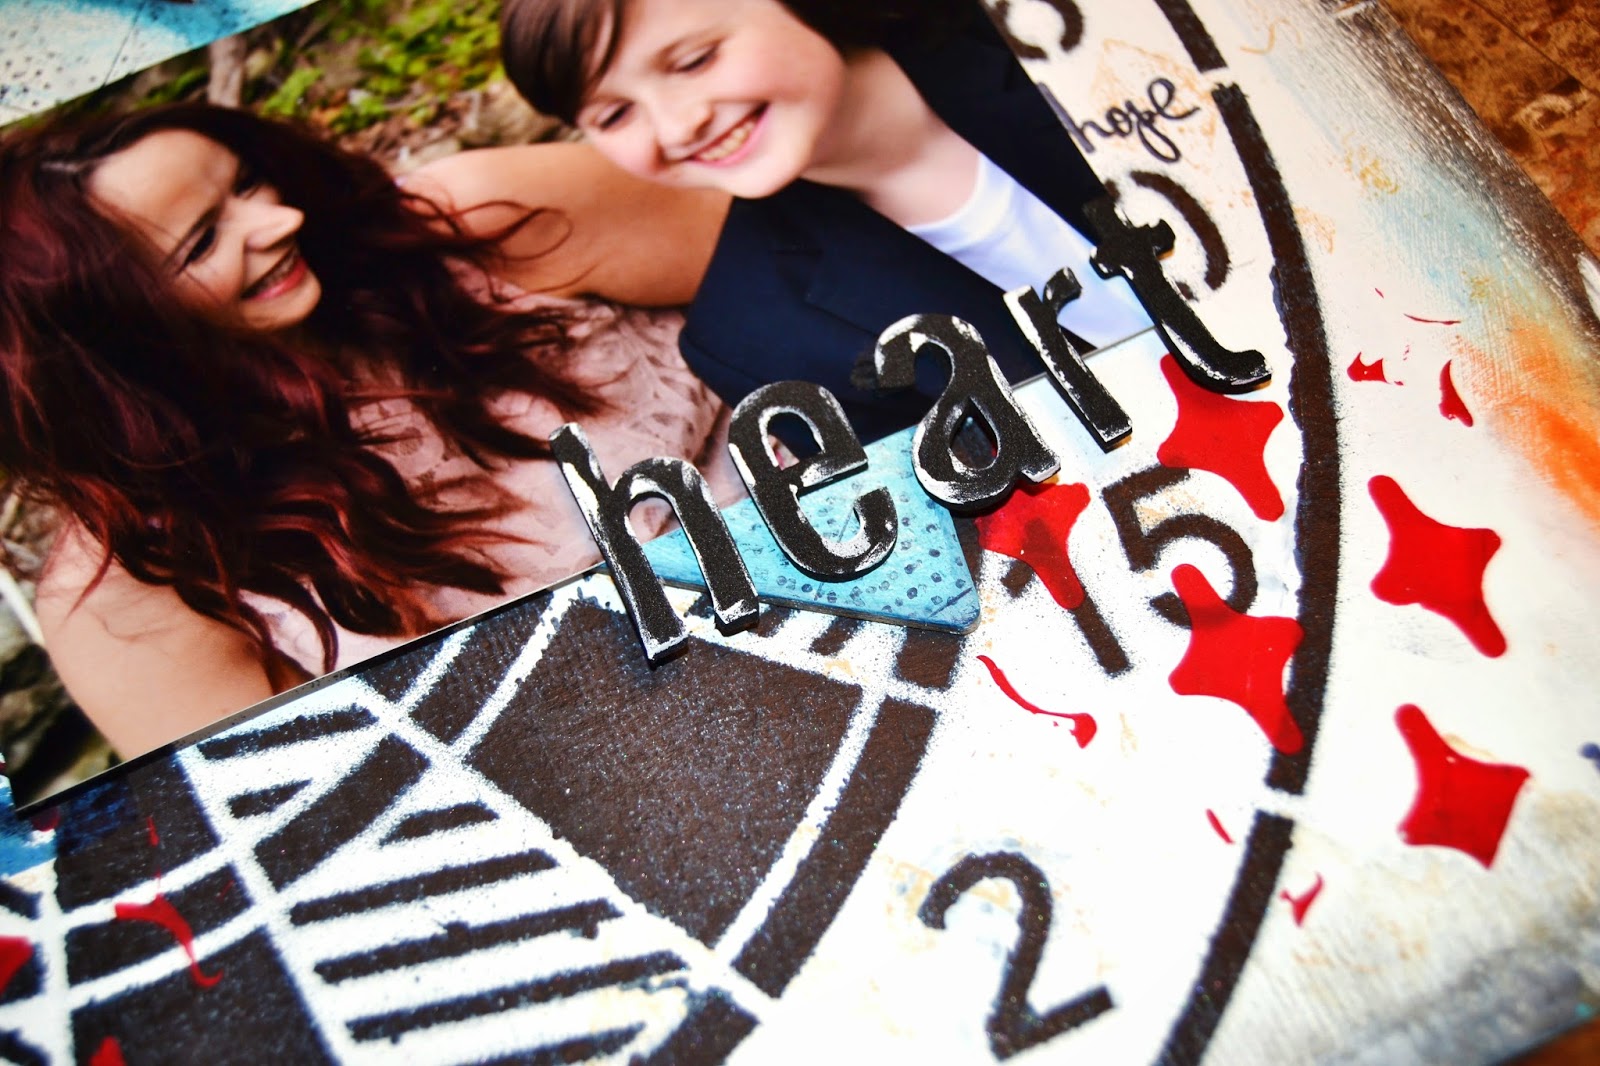
My second project features the joining of two of my favorite companies: Marion Smith and Graphic 45!!

I used Graphic 45's Small Matchbox, along with Marion's Garment District.


You can see more pics here: Garment District Altered Matchbox

Graphic 45

I have been having so much fun stretching myself on the Graphic 45 Design Team.

Here are 3 of my most recent projects:

YES! I actually did a "Project Life" style Scrapbook layout. My sister-in-law would be so proud! LOL


Did I go a little crazy on the fussy cutting? :)


I turned Graphic 45's banners in to a spooky shingled roof for my little house made from a file folder!
What?! YES!

You can see these and more over on the Graphic 45 Blog

For Others...

Many of you know that I have a total heart for an organization called Saving Grace, which is a home that houses and helps girls between the ages of 18-early 20s who have aged out of foster care, are homeless or have a living situation that is unhealthy.

Last year I was asked to come to their mentor/mentee retreat and do a project with the ladies. We did crowns and dress because the them was "What Not to Wear."

This year I am so honored to be asked back again. This year, the theme is "Fight Like a Girl" and I was asked to design a paper mache dress form.

Here is what I came up with:


I was able to use this piece on a mixed media website that I was asked to do a guest post for.

You can read more about the story behind this piece at: Mixed Media Art-Taking Your Art Journaling Out of a Book .

For me....

As an artist in this business, it is so easy to get so caught up in "assignments" that you never create just for yourself.

Last week, I felt that tug in my creative spirit. I thought...when was the last time I sat down and created with out an agenda? An honestly...the answer was close to 5 months.

So, I decided to change that.

I pulled out this old canvas that I had played with last year, but never finished. It had mod podged newspaper covered in Tattered Angels spray ink, with a green glittered fleur-de-lie kind of shape in the corner. Ya...I had no idea where I was going when I started this one! LOL.

I've been wanting to work more on my painting skills, so I decided to use this project for some fun experimenting on my painting style. I just played....

This is what I came up with: 


She's not done yet, but I love her. I plan on adding a quote and some other fun elements, but even if I never finish it or it takes me another year, it's still a symbol of what I can do and reminder to do it more often..just for the fun of it.

So there you go...a quick little update on what has been going on in my studio.

I promise, now that school is back in session, I WILL be more faithful to blogging. :) or atleast I'll try. 

Until next time friends, remember to make your art an intentional part of your life and not an after thought.

XOXO,
KERI

P,S. Did I mention my YouTube Channel "The Creative Life Studios?" I've got a lot in the works for it!

P.S.S. Did I mention I am taking a "Belts Bracelets" class from Christy Tomlinson? Ya...super excited. More on that later. :)


Tuesday, June 10, 2014

Creating a Masculine Layout with Stencils

Hello Lifers!!

Today I am so excited to be sharing a mixed-media layout over on The Crafter's Workshop Blog.

Here's a little sneak peek!


Head on over to their blog for more details and a complete tutorial!


Until Next time...make your art intentional...not an after thought.

XOXO,

KERI

Wednesday, January 15, 2014

Create Your Happy Day!!

Hello Lifers!!

Happy 2014...how is the new year treating your so far?

I had hoped to blog a little earlier than 15 days into the new year, but between snow days and traveling to Anaheim for CHA it's been a little crazy around here.

CHA Anaheim was this past week (January 10th-14th) and I can't WAIT to share all of the things I learned and amazing things I saw. Look for that post coming soon (probably in 2 parts...it was THAT good!)

While I was away, it was my turn over on the Susan K. Weckesser Blog, My Sweet Earth.

I hope this little card inspires you to "Create Your Happy Day!!"


For Full Details, head on over!


Until next time...make your creativity a choice...not an after thought.

XOXO,

KERI

Friday, December 13, 2013

Pin-Win-- DIY Light Box

If you're like me, you love Pinterest, but rarely actually do anything with them. 

However, today I wanted I share my most successful "PIN-WIN" 


This pin leads you to a tutorial on how I make this easy and amazing DIY Light Box. 


My hubby made the base of mine using the box from a new piece of furniture we had just bought. 

Here is mine: 


My studio table is a 6ft old dining room table. The canvas you see is an 8x10, so you can see that it is easy to accommodate large projects if you make your frame larger. (This picture makes my canvas look like it's floating! Lol) 

Check out the tutorial by Flax and Twine. I'm sure you'll love it! 

And thanks Flax and Twine for a great and easy to follow tutorial. 

Xoxo

Keri

Saturday, September 7, 2013

Double Whammy Saturday: List Yourself #8 and a Guest Blog!

I am so excited today!

I have a DOUBLE bit of fun on The Creative Life Blog today!

First, I have the awesome privilege of being a guest blogger for Artsy Addicts.


Check out the Artsy Addicts Blog for much more about this project!!

List Yourself Saturday!!

I loved thinking about my childhood doing last week's list, so I thought we would spend a little more time there this week.


Here's my list!
Gumbo (I'm southern!)
Fried Catfish
Fried Pickles
Peanut Butter and Jelly
Popeye's Chicken
Chicken and Rice with Gravy (my mama's Sunday staple)
Fried Eggplant
Mama's Mac and Cheese
Cinnamon Toast Crunch
Butterfinger Blizzard

Great...I've made myself hungry! LOL!

What about you? What makes your stomach growl just thinking about?

Leave your list in the comments!

Until next time my creative friends....

XOXO
KERI

Friday, May 3, 2013

New Layout and FIRST time on the SNR Blog!

I am so excited to be featured on the Scrapbook News and Review Blog today for their Color Palette of the Week.

This week SNR is focusing on the color NAVY!

Navy is such a classic and versatile color. Just by what you pair it with, you can go masculine...feminine...sophisticated or fun!

Here is this week's color palette:


I have to admit..the quilt is not something I would ever have in my house...it's just not me. LOL!

But, when I saw this color palette, I INSTANTLY remember a collection by Teresa Collins called Now and Then


To me, the collection was a muted, feminine version of the color palette I had to work with. The only thing missing was that golden/camel color at the beginning. So, I added a little My Mind's Eye Lost and Found hexagon paper and some Pink Paislee Wooden Letters painted gold.


Here's a quick tutorial on the flowers!

1) Cut your flowers from whatever die or punch you have available in 3-4 sizes. I used Tim Holtz's Tattered Flowers by Sizzix. The die has 4 different sizes on one block, so it made it super easy to cut a lot a one time.

2) Lightly spray your flowers with water and then scrunch them up.

3) Let them dry completely (hit them with a heat gun if you need to speed it up!)

4) Once they are completely dry, ink them if you want and layer them up! Plan out your flowers BEFORE gluing because you don't want to get to your last flower and realize you have 2 that are the same size or pattern.

5) I added 7Gypsies silver studs for my centers, but you can use buttons, crystals, stickers...what ever you have on hand. 

I hope you enjoyed this quick little post! I can't wait to show you more of my Creative Life!